
How to Patch a Hole in Inflatable Kayak: Step-by-Step Repair Guide for 2026
Learn how to patch a hole in inflatable kayak hulls with our October 2026 repair guide, covering leak detection, adhesive prep, and curing.
 By Maggie Nichols
Updated October 5, 2026
By Maggie Nichols
Updated October 5, 2026
Punctures from submerged river timber, sharp gravel bars, or errant fishing hooks can instantly sideline an afternoon on the water. When an air chamber begins hissing, knowing how to patch a hole in inflatable kayak fabrics prevents an inconvenient leak from ending your boating season. Modern drop-stitch floors and multi-chamber PVC air bladders provide remarkable rigidity, but they still require reliable field maintenance when abrasions compromise structural air retention. Understanding the right balance of solvent cleaning, flexible urethane adhesives, and peel-and-stick backing patches keeps your boat fully seaworthy.
While paddling rugged inflatable kayak hulls offers incredible portability and trunk-friendly transport, unexpected punctures require deliberate mechanical care. A rushed repair that skips surface abrading or ignores proper adhesive curing times will often delaminate once the chamber reaches full operating pressure. Applying the right adhesive matrix restores the safe payload capacity of your boat so you can maintain buoyancy and freeboard. Taking a measured, methodical approach ensures your patch holds securely against turbulent river currents and fluctuating ambient temperatures.
| Award | Product | WSG Score About WSG ScoreThe WSG Score is our own rating from 0 to 10, based on performance, design and build, ease of use, and value. It reflects independent research and is never influenced by manufacturers, retailers, or affiliate commissions. Learn more › | |
|---|---|---|---|
| Best Overall |
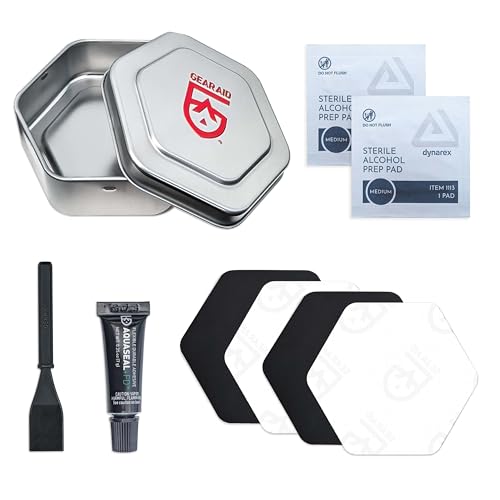
GEAR AID Aquaseal FD River & Sea Kayak Repair Kit
|
7.8/10 | Buy |
GEAR AID Aquaseal FD River & Sea Kayak Repair Kit
This compact repair kit provides permanent, flexible waterproof fixes for inflatable kayaks, drysuits, and waders. It is an indispensable emergency safety accessory for inflatable boaters and kayak anglers who need reliable field repairs on lakes and rivers.
Pros
- Compact, durable metal tin protects the adhesive tube from being punctured in your dry bag
- Bonds effectively to standard inflatable kayak materials including PVC, coated nylon, and neoprene
- Hex-shaped patches resist corner peeling better than standard square tape cuts
- Clear and black patch options allow for discreet color-matched repairs on dark or light gear
Cons
- The 0.25 oz adhesive tube is sized for small punctures and spot repairs rather than extensive tears
- Urethane adhesive requires cure time to reach full strength, necessitating temporary tape reliance while on the water
- Contains four patches total, which may require replenishing after multiple paddling excursions
Complete Step-by-Step Guide to Inflatable Kayak Patching and Hull Maintenance
Patching a punctured air chamber requires methodical surface preparation, the correct bonding agent, and adequate cure time. Rushing the repair process almost always results in microscopic channels where pressurized air escapes once the kayak enters cool water. By understanding the mechanical properties of inflatable kayak textiles and polyurethane adhesives, you can execute a repair that matches the original durability of the hull. Approaching the fix with patience ensures your boat holds firm pressure across long days of touring, angling, or whitewater paddling.
Pinpointing Elusive Leaks in Kayak Chambers
Locating a tiny puncture in a large inflatable chamber can prove frustrating when air escapes without an audible hiss. The most reliable diagnostic method involves inflating the kayak to its standard operating pressure and methodically wiping the surface with a mild mixture of liquid dish soap and water. Microscopic punctures and seam fissures will immediately generate expanding clusters of white foam bubbles as escaping air breaks the liquid tension. You should examine the hull section by section, paying particular attention to the high-wear underside, drop-stitch floor perimeters, and high-friction contact points near seat mounts.
Once bubbles identify the leak, drying the fabric thoroughly and marking the exact location prevents you from losing track of the hole. A wax pencil, grease crayon, or small strip of low-tack painter tape works well for marking without staining the outer coating. Avoid using permanent chemical markers because volatile solvents in marker ink can bleed into the synthetic coating and compromise future adhesive bonds. Inspect the surrounding fabric carefully for secondary scuffs or abrasions that might have occurred during the same impact with river rocks or submerged brush.
Essential Repair Materials and Workshop Setup
Executing a reliable fix requires gathering appropriate materials before beginning the adhesive application. A dedicated repair setup should include a quality urethane adhesive, solvent-resistant applicator brushes, abrasive scuff pads, clean lint-free cloths, and compatible patch fabric. The GEAR AID Aquaseal FD River & Sea Repair Kit provides a practical foundation for this work by combining a 0.25-ounce tube of flexible Aquaseal FD adhesive with four 2.5-inch Tenacious Tape hex patches in both black and clear finishes. Having these components packed in a compact, reusable metal tin allows paddlers to keep essential repair tools ready in a dry bag or vehicle glove box.
Polyurethane adhesives like Aquaseal FD are specifically formulated to cure into a tough, rubbery barrier that flexes naturally with hull inflation and deflation cycles. These adhesives bond securely to PVC, coated nylon, neoprene, and polyurethane fabrics without cracking, peeling, or delaminating from moisture exposure. Before starting, clear a flat, well-ventilated work surface where the kayak can rest completely undisturbed throughout the curing cycle. Working in moderate ambient temperatures between sixty and eighty degrees Fahrenheit ensures the adhesive flows smoothly and achieves maximum chemical bonding strength.
Preparing the Hull Surface for Maximum Bond Adhesion
Surface preparation serves as the single most critical phase of patching any inflatable watercraft. You must first deflate the affected air chamber completely to ensure that residual internal air pressure does not bubble outward through the wet adhesive. Opening the chamber valve allows the fabric to lay perfectly flat against a firm backing board or flat tabletop. Attempting to glue a patch onto a partially pressurized kayak will push air channels through the bonding agent, rendering the repair useless within minutes of launch.
Once deflated, clean the area surrounding the puncture thoroughly using isopropyl alcohol or an approved surface prep cleaner. This step strips away dried algae, lake silt, body oils, sunscreen residues, and microscopic grit that prevent adhesives from gripping the base textile. Allow the alcohol to evaporate completely so the surface remains bone dry before proceeding to mechanical abrasion. Contaminants left behind on unwashed PVC will act as a release agent, causing even the strongest adhesive to peel under working chamber pressure.
After degreasing the surface, lightly abrade the glossy outer coat of the kayak material using fine-grit sandpaper or an abrasive scuffing pad. The objective is simply to remove the slick top finish and create a textured mechanical tooth for the adhesive to grab. Take care not to sand aggressively into the internal polyester or nylon structural scrim threads, as excessive friction weakens the fabric. Wipe away all residual sanding dust with a dry, lint-free microfiber cloth so the abraded zone remains spotless and ready for bonding.
Applying Urethane Adhesives and Flexible Patches
Applying the patch demands deliberate layering and steady pressure to avoid trapping air bubbles beneath the material. If you are cutting custom patch material from bulk fabric, always round the corners with sharp scissors to eliminate sharp points that peel over time. Pre-formed hexagonal patches, such as the 2.5-inch Tenacious Tape patches included in the GEAR AID kit, already feature rounded edges engineered to deflect snagging from branches, gear bags, and footwear. A patch should extend at least one-half inch to one inch in every direction beyond the edges of the visible tear or puncture.
Squeeze a small bead of Aquaseal FD adhesive directly over the puncture, spreading it into an even, thin film with an applicator brush or plastic spreader. For larger holes or high-wear areas, applying a thin perimeter of adhesive slightly wider than the patch creates an impenetrable moisture barrier around the bond edge. Press the patch firmly onto the adhesive bed, starting from the center and working outward toward the edges. This outward wiping motion pushes out trapped air pockets, ensuring uninterrupted surface contact between the hull fabric and the patch backing.
Use a smooth roller, the back of a spoon, or a seam burnishing tool to apply firm, uniform downward pressure across the entire patch. Clean away any excess adhesive that squeezes out around the perimeter with an alcohol-dampened cloth before it begins to tack. If you prefer a clean aesthetic or need visibility over printed hull graphics, clear patches allow easy visual inspection of the underlying repair. Securing the patch with consistent contact ensures the urethane bond cures into a flexible, watertight seal that will not lift during folding.
Managing Proper Cure Times and Pressure Testing
Allowing adequate cure time represents the true test of patience for any boater anxious to return to the water. Standard polyurethane adhesives cure through a chemical reaction with ambient humidity, requiring eight to fourteen hours to achieve full cross-linked strength. Moving, folding, or re-inflating the kayak before the adhesive cures completely introduces microscopic stress fractures into the bonding matrix. Placing a flat weight, such as a smooth board topped with a clean water bottle, over the patch prevents corner curling while the adhesive solidifies.
After the recommended curing window has elapsed, remove the weight and inspect the perimeter of the patch closely. The adhesive should feel completely tack-free, smooth, and firmly integrated into the surrounding kayak hull fabric. When paddlers transition between equipment styles, such as moving from inflatable craft to rigid traditional single sit-in kayaks, they often appreciate how durable properly cured urethane repairs truly are. A fully cured patch will flex easily without lifting, cracking, or showing dry white margins along the bond line.
Conduct a progressive pressure test before taking the repaired kayak back out into deep water. Inflate the chamber to roughly half of its normal operating pressure, allowing the hull to stretch and settle for thirty minutes. If the patch maintains a smooth profile without edge bulging, inflate the chamber to full operating pressure and apply soapy water across the repair zone. The absence of bubbles confirms an airtight bond, giving you total peace of mind for your next paddling adventure.
Temporary Shoreline Repairs Versus Permanent Shop Cures
Emergencies on remote river corridors often demand quick action, but shoreline fixes should never be confused with permanent structural repairs. A field puncture miles from a boat launch requires immediate stabilization using aggressive pressure-sensitive repair tape to paddle safely back to shore. Pre-cut Tenacious Tape patches can be applied dry directly over a clean, dry puncture without liquid glue to provide emergency buoyancy. However, emergency tapes remain temporary expedients meant to get you off the water, rather than permanent cures for long-term paddling.
Once you return home, peeling away temporary field tapes and applying a dedicated urethane adhesive ensures permanent seaworthiness. Always wear a properly fitted US Coast Guard approved Type III personal flotation device under Title 33 CFR Part 175 whenever you paddle on water. A personal flotation device and an accessible whistle protect your safety in the rare event that an emergency field repair gives out far from the launch point. Never embark on extended wilderness crossings or paddle through fast whitewater rapids relying solely on an untested field patch.
Seam Failures, Valve Leaks, and Structural Tear Considerations
Not all air loss originates from simple fabric punctures, as seams and inflation valves present distinct mechanical challenges. Overlapped fabric seams undergo constant shear forces during inflation, making seam leaks more complex to repair than flat hull punctures. If an overlapping seam separates, thin liquid urethane adhesive must be worked deep into the gap using a fine brush before clamping the seam between protective boards. Allowing the clamped seam to cure for a full twenty-four hours restores the shear strength required to withstand operating pressure.
Air escaping around the perimeter of an inflation valve often stems from loose mechanical threads rather than torn hull fabric. Most Boston valves and Halkey-Roberts valves feature internal and external threaded rings that tighten against the hull textile with a specialized valve wrench. Before attempting an adhesive repair near a valve, try tightening the valve housing clockwise to compress the internal rubber sealing gasket. If air continues to hiss from the valve opening itself, unscrew the core to clean out trapped river sand or replace a worn silicone diaphragm.
Extensive tears exceeding two or three inches in length require a dual-patch strategy to withstand high internal air pressure. For large tears, you should install an internal backing patch inside the deflated chamber, followed by a matching external patch over the outer hull. This sandwich technique distributes tensile load evenly across both sides of the damaged scrim, preventing the tear from propagating under heavy chop. If a tear crosses a complex molded fitting or structural drop-stitch seam, consulting a professional marine repair technician may prove the safest long-term choice.
Maintaining Chamber Integrity and Preventing Future Punctures
Adopting sound maintenance habits dramatically reduces the likelihood of future punctures and extends the service life of inflatable watercraft. Always monitor chamber pressure when launching on cool mornings that turn into hot, sunny afternoons. Direct sunlight warms trapped air quickly, causing internal chamber pressure to spike beyond safe working thresholds. Bleeding off small amounts of air during midday shore breaks prevents excessive strain on patched seams and chamber walls.
When transporting your kayak, avoid dragging the hull across concrete boat ramps, coarse gravel, or oyster-encrusted shorelines. If you choose to haul your boat partially inflated, utilize padded saddles or specialized kayak vehicle racks with broad cam straps rather than narrow tie-downs that create abrasive pinch points. Rinsing your kayak with fresh water after every outing removes grit, salt crystals, and corrosive minerals that wear away protective fabric coatings during transit. Storing the hull loosely rolled in a climate-controlled room prevents crease fatigue and keeps your patches securely bonded for seasons to come.
Mastering the basic mechanics of hull patching empowers you to handle unexpected leaks with total confidence. Taking the time to properly clean, scuff, glue, and cure your inflatable chambers restores the structural integrity of your boat so you can paddle without worry. Carrying a compact repair kit in your gear dry bag ensures you are always prepared for unexpected shoreline mishaps. With a durable, flexible patch in place, your inflatable kayak remains ready for endless days of safe, rewarding exploration on lakes, rivers, and coastal waterways.
About the author
Maggie Nichols is an experienced paddler, adventure guide, and gear reviewer with more than 25 years around paddle sports. Her background includes canoe touring, whitewater rafting and kayaking, ocean kayak guiding, and extensive outdoor education. She approaches water gear with a strong focus on real-world usability, durability, comfort, and practical performance.