
How to Load a Kayak Onto a Roof Rack: Practical Step-by-Step Guide for 2026
Master how to load a kayak onto a roof rack safely in October 2026 using proven solo lifting mechanics, proper rack cradles, and secure highway tie-downs.
 By Brooke Hess
Updated October 5, 2026
By Brooke Hess
Updated October 5, 2026

Hoisting a rotomolded plastic boat above your shoulders after an exhausting afternoon on the water often feels like an impossible wrestling match. Understanding how to load a kayak onto a roof rack without scratching your vehicle paint or straining your lower back comes down to leveraging mechanical advantage rather than pure muscle. Many solo paddlers struggle when attempting an overhead deadlift, especially when managing high-sided SUVs or crosswinds that push against the hull. Utilizing designated gear like a heavy-duty vehicle rack system creates a predictable loading zone that supports the craft securely from lift-off to highway cruising.
Proper car-topping requires balancing physical technique with the correct mounting hardware to keep both your vehicle and kayak intact. Whether you rely on universal padded J-cradles, side-pivot loaders, or bare-roof foam blocks, knowing how to position the hull eliminates unexpected slips. Securing the boat with non-stretch cam straps and structural bow and stern lines protects the plastic from excessive highway lift and wind drag. Once you master the step-by-step sequence of balancing the bow and using pivot points, loading your boat becomes a fast, stress-free routine.
| Award | Product | WSG Score About WSG ScoreThe WSG Score is our own rating from 0 to 10, based on performance, design and build, ease of use, and value. It reflects independent research and is never influenced by manufacturers, retailers, or affiliate commissions. Learn more › | |
|---|---|---|---|
| Best Overall |
Abahub 32-Inch Soft Roof Rack Pads and Tie-Down
|
8.9/10 | Buy |
| Best Budget |
 Taelakeni J-Bar Kayak Roof Rack (2 Pairs)
|
8.6/10 | Buy |
| Best Premium |
 Rhino-Rack RUSL Universal Side Loader
|
8.6/10 | Buy |
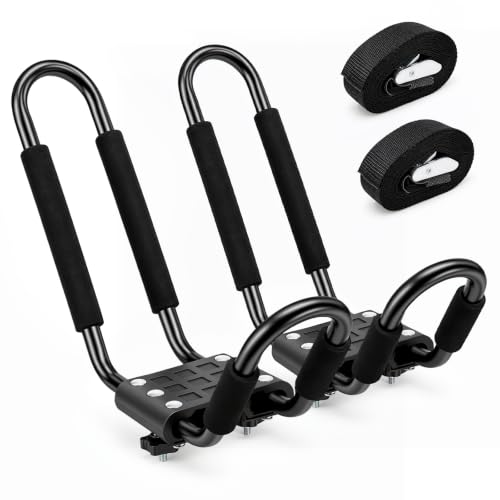 Forluck J-Bar Kayak Roof Rack (150 lbs)
|
8.3/10 | Buy | |
| Best Value |
 PIRIPARA J-Bar Kayak Roof Rack 2-Pair Set
|
8.1/10 | Buy |
 Leader Accessories Folding Kayak J-Bar Rack
|
8.0/10 | Buy |
Abahub 32-Inch Soft Roof Rack Pads and Tie-Down
The Abahub 32-Inch Soft Roof Rack system provides a dependable, portable transport solution for carrying surfboards, longboards, and foamies on cars without factory crossbars. Featuring dense EVA foam padding and durable 1680D fabric with neoprene buckle sleeves, it protects both your car roof and board rails on coastal surf trips.
Pros
- Universal compatibility fits almost any 2-door or 4-door vehicle without requiring permanent roof rails or crossbars
- Comprehensive tie-down package with multiple 13-foot and 16-foot straps plus neoprene buckle guards
- Thick EVA foam core and rugged 1680D outer fabric shield vehicle paint and surfboard hulls from pressure dings
- Quick setup and breakdown make it easy to stow in the trunk between coastal surf sessions
Cons
- Pass-through cabin straps can wick rainwater into the car interior during wet coastal storms
- High-speed highway driving may generate strap vibration hum without twisting the webbing during installation
- Soft foam pad design requires manual tensioning and routine strap checks before high-speed freeway travel
Taelakeni J-Bar Kayak Roof Rack (2 Pairs)
Designed for flat and square crossbars, this dual-pair J-bar carrier provides a space-saving solution to haul watercraft on your vehicle roof. Its steel construction with protective sponge padding holds gear upright without occupying the entire load bar.
Pros
- Space-saving side-loading J-bar profile
- Corrosion-resistant steel with baked finish
- Protective sponge pads prevent gear scratches
- Quick installation via bottom flange threads
- Accommodates up to two watercraft
Cons
- Incompatible with round crossbars
- Restricted to flat or square crossbars
- 150-pound maximum load capacity
Rhino-Rack RUSL Universal Side Loader
Solo paddlers and contractors with tall vehicles can load heavy gear more easily using this pivot-assisted crossbar extension. It integrates with most major roof racks and handles up to 132 pounds when deployed with its telescoping support pole.
Pros
- Simplifies roof loading for a single person
- Broad compatibility with popular crossbar shapes
- Padded contact area helps prevent vehicle scratches
- Telescoping pole accommodates tall trucks and vans
- Includes a heavy duty carry bag
Cons
- Capacity drops to 44 pounds without the support pole
- Adds 10 pounds of auxiliary hardware to transport
Forluck J-Bar Kayak Roof Rack (150 lbs)
Built from powder-coated alloy steel, this J-bar carrier securely transports a single kayak up to 150 pounds across square or oval crossbars. Quick-release hardware and protective EVA foam padding make it a practical, tool-free solution for solo paddlers.
Pros
- Sturdy 150-pound capacity supports heavier watercraft
- Tool-free setup with quick-release mounting nuts
- Protective EVA padding prevents scratches and dents
- Corrosion-resistant powder-coated steel tubing
- Wide-mouth opening simplifies loading and unloading
Cons
- Fixed frame does not fold flat when unloaded
- Single-pair setup carries only one kayak
- Not compatible with round roof crossbars
PIRIPARA J-Bar Kayak Roof Rack 2-Pair Set
The PIRIPARA J-Bar Kayak Roof Rack set provides two pairs of alloy steel carriers designed to haul two kayaks with a combined capacity of up to 150 pounds. It offers a practical vehicle transport solution for paddlers looking to maximize rooftop space on square, oval, or flat crossbars.
Pros
- Transports two full-sized kayaks with four total J-bar uprights included in a single package
- Wide-mouth cradle opening makes side-loading kayaks onto high vehicle roofs significantly easier
- Adjustable padding helps safeguard plastic, composite, and thermoformed hulls from frame abrasion
- Versatile bracket design mounts securely onto flat, square, and oval crossbar shapes
- Includes four 8-foot tie-down straps and mounting bolts for immediate out-of-the-box installation
Cons
- Mounting brackets are strictly incompatible with round crossbar systems
- Total 150-pound limit requires careful weight budgeting if hauling two heavy rotomolded fishing kayaks
- Included 8-foot tie-down straps may prove short for extra-wide beam hulls or tall SUVs, and bow/stern safety lines are not included
Leader Accessories Folding Kayak J-Bar Rack
Designed to carry two watercraft simultaneously, this powder-coated steel carrier folds flat to clear low garage openings when not in use. It mounts without tools onto factory square or aerodynamic crossbars, making it practical for recreational paddlers needing multi-boat transport.
Pros
- Folds down flat for standard garage clearance
- Tool-free mounting simplifies attachment
- Thick foam padding protects hulls from scratches
- Durable powder-coated steel construction
- Includes four heavy-duty tie-down straps
Cons
- Not compatible with round crossbars
- Heavy total weight at nearly 24 pounds
- 150-pound limit may exclude heavier tandem kayaks
Step-by-Step Guide to Loading a Kayak onto a Vehicle Roof Rack
Safely placing a kayak onto a vehicle roof rack requires dividing the total weight of the watercraft into manageable, sequential steps. Rather than attempting to deadlift an entire plastic hull above your head at once, modern loading techniques focus on resting one end of the boat on a pivot point while guiding the other end upward. This approach protects vehicle sheet metal from denting, prevents hull damage, and keeps your spine in a neutral alignment. Preparing your equipment properly and matching your technique to your rack style ensures a secure transition from water to highway.
Understanding Roof Rack Types and Crossbar Profiles
Vehicle roof structures vary widely, and matching your kayak carrier to your specific crossbar geometry is the first critical requirement. Most factory and aftermarket crossbars feature square, flat, or aerodynamic oval profiles designed to support substantial dynamic cargo loads. Dedicated carrier models like the Taelakeni 2 Pairs Kayak Carrier Racks specifically require flat or square crossbars to achieve a rigid mount, while systems from Forluck and PIRIPARA accommodate both square and oval profiles. Circular crossbars often require specialized adapters to prevent the brackets from rotating downward under lateral highway wind resistance.
Vehicles lacking built-in side rails or crossbars can utilize temporary bare-roof systems to transport watercraft securely. Soft roof mats such as the Abahub Kayak Roof Rack Soft Roof Rack Pads for Car employ high-density EVA foam and 1680D fabric with reinforced PVC coatings to cushion bare metal roofs. These universal pads strap directly through the vehicle door frames, providing an immediate non-slip barrier that prevents roof panel bowing. Checking your vehicle manufacturer dynamic roof load limit remains essential, as the combined weight of your crossbars, carriers, and kayaks must never exceed this certified rating.
Essential Transport Gear, Padding, and Secure Strapping
Choosing the correct tie-down equipment makes the difference between a rock-solid highway transport and catastrophic hull deformation. Solo paddlers should always rely on heavy-duty cam straps constructed from tightly stitched webbing rather than mechanical ratchet straps. Ratchet systems generate extreme mechanical leverage that can easily crush the hollow chambers of rotomolded polyethylene boats, leading to permanent bottom dents known as oil-canning. High-quality straps often integrate protective neoprene buckle sleeves, such as those included with Abahub systems, to ensure metal cams never strike your car paint during tightening.
Protective padding on the carriers themselves shields both your watercraft and the crossbars from severe point-pressure abrasions. Hardware configurations like the Forluck Kayak Roof Rack J-Bar Carrier utilize thick EVA foam sleeves and wide rubber bases to absorb road vibrations and distribute hull weight evenly. In addition to primary belly straps, a safe car-topping setup always incorporates front and rear safety lines. Under-hood anchor straps, often called hood loops, provide secure forward connection points when modern aerodynamic vehicles lack exposed steel tow hooks beneath the front bumper.
Pre-Load Preparation: Shedding Rigged Weight and Staging the Hull
Stripping all removable gear from your kayak before lifting drastically reduces overall weight and lowers physical effort. Fishing kayaks frequently carry heavy accessories including raised stadium seats, pedal-drive units, battery boxes, rod holders, and tackle crates that quickly add thirty pounds to the bare hull. Removing these components brings the craft back to its base manufacturer weight, making it significantly easier to balance in windy conditions. Paddlers transporting single sit-in recreational kayaks should also sponge out any cockpit bilge water to eliminate sloshing fluid weight that could destabilize the lift.
Staging your watercraft in the proper position relative to your vehicle eliminates unnecessary carrying steps and minimizes bodily strain. Place a heavy rubber mat, folded moving blanket, or carpet scrap on the ground directly behind your vehicle bumper to protect the kayak stern from rough ground abrasions. Position the kayak on this protective pad parallel to your car bumper if you plan to use a side-assist pivot, or point the bow toward the rear window for a rear-loading rollout. Make sure you leave enough clearance around the vehicle so you can move smoothly without tripping over loose gear.
The Rear-Pivot Method: Step-by-Step Solo Loading from the Stern
The rear-pivot technique is the most common and ergonomic method for loading long kayaks onto SUVs, hatchbacks, and wagons without a partner. Begin by standing at the front of your staged kayak, bending at your knees with a flat back, and firmly grasping the bow handle. Lift the bow of the kayak upward while keeping the stern firmly planted on the protective ground mat behind your vehicle. Walk the bow forward until it rests squarely on your rear crossbar, a rear-mounted roller, or a thick towel draped over the vehicle spoiler.
Once the front section of the boat is supported securely by the rear crossbar, walk back toward the stern resting on the ground mat. Squat down to grasp the stern carry handle or bottom hull chine with both hands, maintaining an engaged core and upright chest. Lift the rear of the kayak to shoulder level, which automatically transfers the majority of the boat weight onto the vehicle roof structure. From this balanced position, push the kayak forward along its keel line until the hull settles squarely into your carrier cradles.
Finally, inspect the fore-and-aft balance of the watercraft to make sure it sits evenly across both vehicle load bars. The widest section of the kayak hull should generally rest between the two crossbars to prevent the boat from tilting upward at highway speeds. If your vehicle features a rear tailgate spoiler, take special care during the initial lift to ensure the bow does not contact the painted trim. Adjust the final position by shifting the stern gently from side to side until the hull matches the contours of your roof hardware.
The Side-Lift Method: Utilizing Mechanical Load-Assist Hardware
Loading a wide fishing kayak onto a high-roof van or lifted pickup truck often renders rear-pivot sliding impractical or hazardous to vehicle trim. In these scenarios, mechanical assist systems provide a side-loading solution that halves the physical lifting effort. The Rhino-Rack Universal Side Loader for One Person clamps directly onto elliptical and square crossbars to provide an extendable support arm alongside the vehicle. A telescoping support pole extending up to 87 inches braces the loading arm against the ground, supporting up to 132 pounds of watercraft weight during the pivoting process.
Using a side-assist loader begins by positioning your kayak parallel to the vehicle directly beneath the extended loading bar. The paddler lifts the bow of the kayak onto the padded extension arm and fastens the integrated quick-release strap to keep the boat from sliding off. With the front end held firmly in place above head height, the paddler walks to the stern of the boat and lifts it directly onto the rear vehicle crossbar. Once the rear of the kayak rests on the rack, the paddler unstraps the bow from the side extension and slides it across into the primary carrier.
Retracting the telescoping arm and stowing the hardware in your vehicle completes the side-loading sequence in just a few minutes. This two-stage mechanical lift allows a single paddler to manage bulky rotomolded hulls that would otherwise require two people to raise overhead. Built-in load stops and heavy-duty clamp adapters ensure the assembly remains rigid against the crossbars throughout the hoist. For paddlers managing chronic shoulder fatigue or tall vehicle clearances, a side loader eliminates the dangerous overhead pressing movements associated with traditional car-topping.
Loading into J-Cradle Carriers vs Flat Crossbar Pads
Deciding whether to transport your watercraft on its side in J-cradles or flat against padded crossbars depends on roof space and hull design. J-bar carriers, including the PIRIPARA Kayak Roof Rack 2 Pairs J-Bar Carrier and Taelakeni carriers, tilt the kayak onto its sturdy side chine at approximately a 45-degree angle. This side-mount configuration takes up minimal horizontal crossbar width, allowing paddlers to transport two kayaks side by side on a standard passenger car. Wide-mouth openings on these steel J-bars simplify the loading process by creating an angled target that catches the boat hull as you slide it upward.
Storing vehicles inside standard residential garages can be challenging when tall, fixed J-bars remain bolted to the roof crossbars. The Leader Accessories Folding Kayak Roof Rack 4 addresses this issue with a quick-release folding mechanism that allows the alloy steel arms to lie completely flat when not in use. Folding the racks downward eliminates overhead clearance concerns without requiring tool-assisted removal after every lake trip. Conversely, paddlers who transport wide pontoon-style fishing hulls often prefer flat crossbar pads or foam blocks that support the broad flat bottom across two parallel bars.
Flat mounting lowers the overall vehicle profile and slightly reduces side-wind buffeting during highway driving compared to vertical J-cradles. However, resting a wide polyethylene kayak flat on crossbars exposes a broad surface area that requires precise strap pressure to avoid denting the hull bottom. Paddlers looking to avoid roof-loading logistics entirely sometimes choose packable options like rugged inflatable kayaks that fold into a duffel bag for trunk storage. For rigid hard-shell owners, pairing high-density foam pads with properly spaced cradles delivers the best combination of security and hull preservation.
Proper Strapping Mechanics: Securing Hull, Cradles, and Highway Lines
Thread your tie-down straps deliberately to ensure the kayak remains locked to the vehicle load bars even under sudden highway braking. When using J-cradles, pass the strap behind the upper upright bar, toss the non-buckle end across the kayak hull, loop it beneath the bottom crossbar, and bring it back up to the cam buckle. Threading the strap behind the rack arm ensures that even if strap tension loosens slightly, the webbing cannot slide laterally off the end of the bar. Always inspect the cam buckle to confirm the strap feeds through from the back of the metal teeth so the spring mechanism bites firmly into the webbing.
Tighten the cam straps by pulling downward with steady hand pressure until the boat is firmly seated against the cradle padding. Avoid using your full body weight or aggressive pulling angles that could distort the shape of a rotomolded plastic deck. Once the primary belly straps are tightened, bundle the excess strap tails and tie them securely around the crossbars using half-hitch knots. Securing loose strap ends prevents them from whipping wildly against your vehicle windows or buzzing noisily in the wind at highway speeds.
Rigging bow and stern tie-downs completes the vehicle transport safety system and provides essential insurance against roof rack failure. Run non-stretch cord or dedicated cam-hook lines from the front kayak carry handle to your vehicle bumper recovery points or under-hood T-strap loops. Fasten a matching rear line from the kayak stern handle to the vehicle hitch receiver or rear tow loop, maintaining balanced triangular tension. These end lines prevent aerodynamic highway lift from ripping factory crossbars off your roof and stop lateral crosswinds from twisting the boat out of alignment.
Avoiding Critical Loading Mistakes: Hull Warping and Hardware Failure
Over-tightening tie-down hardware remains the primary cause of permanent structural damage to rotomolded polyethylene kayaks. Summer heat softens plastic polymers rapidly, allowing excessive strap tension to leave permanent indentations across the keel or gunwales. Using proper cradles with EVA foam padding, such as those on Forluck and PIRIPARA systems, helps distribute clamping force across a larger surface area. If your boat develops slight oil-canning indentations from overtightening, placing the unstrapped hull in direct sunlight on a warm day can often restore its original molded shape.
Failing to verify roof hardware tightness before departure can lead to dangerous equipment separation on rough roads or highways. Road vibrations, temperature fluctuations, and crosswinds can gradually loosen mounting flange nuts over long drives. Inspect every bracket screw and hand knob on your J-bars or crossbar pads before loading your boat to ensure the hardware clamps securely to the load bars. Furthermore, always respect the maximum 150-pound load capacities stated for carriers like the Leader Accessories and Taelakeni racks, taking care never to overload dual-carrier setups with excessively heavy craft.
Post-Load Verification and Safe Highway Transit Checks
Performing a rigorous physical shake test before pulling out of your driveway confirms whether your kayak is road-ready. Grasp the kayak bow firmly with both hands and attempt to move it from side to side and up and down with moderate force. If your straps and cradles are installed correctly, the entire vehicle should sway slightly on its suspension while the kayak remains completely motionless on the crossbars. Any slipping, pivoting, or clicking indicates that a mounting knob is loose, a crossbar clamp is misaligned, or a cam strap requires additional tension.
Highway driving introduces strong aerodynamic forces, crosswinds, and road vibrations that can cause straps to settle during the first few miles of travel. Plan to pull over into a safe rest area or parking lot after driving for approximately ten to fifteen minutes to re-inspect your entire transport setup. Check the tension on both belly straps, verify that your bow and stern lines remain taut, and feel the carrier mounting knobs to ensure they have not backed off. Making this routine inspection part of every paddling trip guarantees peace of mind and keeps your gear secure across hundreds of miles of highway travel.
About the author
Brooke Hess is an accomplished whitewater kayaker and outdoor writer with years of experience paddling rivers around the world. He has competed internationally in freestyle kayaking and extreme races and has represented the United States in competitive kayaking. His deep understanding of river conditions and paddling performance gives her valuable insight into technical kayaking gear.