
How to Get Into an Inflatable Kayak From the Water: Practical Guide for 2026
Learn how to get into an inflatable kayak from the water with practical deep-water re-entry steps, buoyancy tips, and safety checks for October 2026.
 By Sara James
Updated October 5, 2026
By Sara James
Updated October 5, 2026
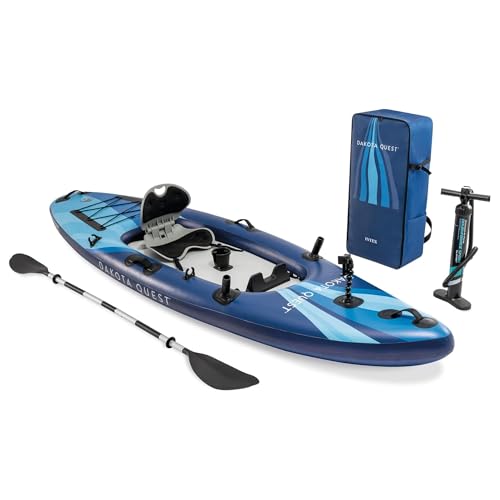
Capsizing or slipping unexpectedly into deep open water turns a relaxed afternoon paddle into an urgent test of physical skill and composure. Knowing how to get into an inflatable kayak from the water requires a distinctly different mechanical approach than remounting a rigid plastic boat because buoyant air tubes compress and deflect under direct vertical load. While modern watercraft like the INTEX 68245EP 10.5ft Dakota Quest Sit-On-Top offer exceptional primary stability across a wide thirty-five-inch beam, deep water removes bottom contact and forces you to rely entirely on floating leverage. Wearing an inherently buoyant life jacket alongside proven recovery techniques ensures you can re-enter the cockpit safely without exhausting your physical stamina.
Inflatable hulls present distinct hydrodynamic qualities that provide high buoyancy yet complicate standard self-rescue maneuvers if your body remains vertical in the water column. Swimmers must learn to kick their legs horizontally to the surface, grip across the deck to the opposing gunwale, and slide their torso smoothly over the rounded pontoon. Paddlers exploring heavy-duty inflatable kayak designs know that reinforced side chambers and thoughtful deck rigging make open-water recovery significantly more manageable. Practicing these re-entry drills in protected shallows before launching into expansive reservoirs or tidal estuaries builds the muscle memory necessary to stay safe in unpredictable conditions.
| Award | Product | WSG Score About WSG ScoreThe WSG Score is our own rating from 0 to 10, based on performance, design and build, ease of use, and value. It reflects independent research and is never influenced by manufacturers, retailers, or affiliate commissions. Learn more › | |
|---|---|---|---|
| Best Overall |
Intex Dakota Quest 10.5ft Inflatable Kayak
|
8.4/10 | Buy |
Intex Dakota Quest 10.5ft Inflatable Kayak
Designed for recreational paddlers and casual anglers, this sit-on-top inflatable kayak features a wide, buoyant deck with integrated rod and camera mounts. Its elevated seat and all-inclusive accessory kit make it a convenient option for calm lake excursions.
Pros
- All-in-one package includes pump, paddle, and carry bag
- Elevated seat keeps paddlers comfortable above the waterline
- Wide profile offers dependable primary stability for beginners
- Integrated mounts easily accommodate fishing and camera gear
Cons
- Manual hand pump requires physical effort before launching
- 352-pound limit restricts heavier paddlers carrying extra gear
- Large tracking skeg can catch in shallow water
Mastering Deep-Water Re-Entry in an Inflatable Kayak
Re-entering an inflatable kayak from deep water requires understanding how flexible air chambers behave under concentrated human weight. When a swimmer pulls down vertically on a pontoon, the tube compresses while the opposite side lifts off the surface. This reaction can easily flip the boat over or push it away across the water. Safe boarding relies on kicking your legs horizontally to the surface and sliding your torso across the craft rather than hauling down with your arms.
Hydrodynamic Behavior of Inflatable Pontoons During Recovery
Inflatable hulls displace water differently than rigid composite or rotomolded plastic boats. Because side pontoons hold compressed air, they offer massive reserve buoyancy under distributed loads. Concentrating all your weight on one tube momentarily deforms the outer wall, altering hull balance. Pulling straight down turns the kayak into a pivot that can roll right back over you.
Beam width directly affects how stable the craft remains while you attempt to board. The INTEX 68245EP Dakota Quest measures two feet eleven inches across, giving you a thirty-five-inch platform that delivers dependable flatwater stability. Reaching across that width from deep water requires full arm extension. Without reaching toward the far gunwale, your hanging weight will pull the near pontoon straight under.
Proper internal air pressure keeps the side tubes firm and supportive during re-entry. Using the included high-pressure pump ensures the chambers resist sagging when your torso slides across the deck. An under-inflated kayak buckles under climbing weight, absorbing your momentum and trapping your hips against the side. Firm inflation lets your life jacket slide smoothly across the durable exterior.
Immediate Actions Following an Unplanned Capsize
Staying calm after an unexpected spill is crucial for personal safety. Cold water can trigger a sudden gasp reflex that risks taking water into your lungs. Focus on steady breathing, verify that your life jacket supports you, and maintain a firm grip on the kayak. Inflatable boats sit high on the water and can drift away rapidly in light wind if released.
Securing your paddle is the next priority before initiating recovery. The Dakota Quest comes with an eighty-six-inch adjustable aluminum paddle that can float away while your hands are busy. Slip the shaft beneath the deck bungees or attach a tether so it trails safely beside the boat. Losing your paddle leaves you stranded even after successfully climbing back into the cockpit.
If the kayak has capsized upside down, you must right the boat before boarding. Swim to the center, reach across the hull bottom, and grip the far pontoon or grab line. Place your feet against the near tube and lean back into the water, using your body weight to flip the craft. The wide hull catches air and rolls right-side up, ready for remounting.
Step-by-Step Side-Scramble Boarding Procedure
Positioning yourself correctly relative to wind and current simplifies your climbing effort. Float beside the cockpit area, facing the side of the kayak with the breeze at your back. This orientation prevents the boat from drifting away from your hands while you align your body. Being centered alongside the seat ensures your hips land over the most stable portion of the floor.
Correct hand placement prevents the hull from tipping over while you pull yourself up. Rest one hand on the near tube and reach your other hand across the deck to grip the far pontoon. Gripping the far side counteracts your upward pull by exerting downward pressure on the opposite gunwale. Never use loose deck bungees as climbing handles, since elastic cords cannot support your body.
Elevating your legs to the surface is the single most vital step in the process. Letting your legs dangle vertically creates dead drag that overpowers your shoulder muscles. Kick your feet vigorously in a strong flutter kick until your body lies flat along the water surface. Once you achieve this horizontal planing position, kick hard and slide your chest directly onto the pontoon.
Pull your ribcage and hips completely onto the deck until your weight rests on the cockpit centerline. Keep your head low and your chest flat against the boat to avoid raising your center of gravity. Rest briefly to catch your breath while holding both sides of the hull. Slowly rotate your hips, pull your knees in, and slide your bottom into the seat.
Heel-Hook and Stirrup Techniques for Fatigued Paddlers
Paddlers who lack explosive upper-body strength can rely on mechanical alternatives to climb aboard. When cold water or fatigue saps your arm power, the heel-hook re-entry provides dependable leverage. Float beside the cockpit facing the stern, reach across to the far tube, and hook your heel over the side pontoon into the seat. Pushing down with your leg lifts your hips and rolls your torso onto the deck.
Carrying a simple webbing stirrup provides an extra safety advantage on open water. A five-foot loop of heavy-duty flat webbing tied to an opposite seat bracket creates an instant boarding step. Stepping down into the submerged loop lets your leg muscles elevate your torso smoothly out of the water. This method requires minimal upper-body exertion and keeps the kayak stable during entry.
Open-deck sit-on-top inflatables offer a major safety benefit over enclosed designs during deep-water recoveries. In traditional sit-in kayaks, capsizing fills the cockpit with water that must be pumped out before continuing. An open inflatable sheds excess water naturally, letting you climb aboard without pumping out hundreds of pounds of standing liquid. This immediate recovery reduces cold immersion time and conserves physical energy.
Navigating Deck Rigging, Accessory Mounts, and Snag Hazards
Modern adventure kayaks often include built-in hardware that can create snag hazards during a scramble. The Dakota Quest features two detachable rod holders, bungee cords, and a dual camera or phone mount on the front deck. While these accessories add convenience, rigid brackets can catch your life jacket during a chest slide. Always plan your entry along the unobstructed middle section of the pontoon.
Wearing a properly fitted paddling life vest is just as vital as mastering re-entry technique. Bulky recreational life jackets can snag on gunwales and restrict your arm motion while trying to climb aboard. A kayak-specific Type III life jacket features sculpted foam panels and high-back clearance designed to clear raised seat frames. Tucking away excess adjustment straps prevents accidental hang-ups on deck accessories during rescue.
Federal maritime regulations mandate essential safety equipment on open coastal and inland waterways. United States Coast Guard standards under Title 33 CFR Part 175 require an approved life jacket for every boater, along with an audible sound-producing device. Attaching a pea-less whistle directly to your life jacket shoulder strap ensures you can call for help if an injury occurs. Keeping signaling gear on your person ensures it remains accessible during an accidental swim.
Cockpit Drainage and Weight Capacity Thresholds
After climbing back aboard, centering your body and checking cockpit drainage restores proper paddling balance. The Dakota Quest features an elevated seat and adjustable footrest that keep your hips raised above residual floor water. Sit upright with your knees resting against the inner tubes to keep your center of mass planted securely. Take a few gentle test strokes to confirm the hull feels balanced before adjusting your gear.
Staying within safe weight limits preserves essential reserve buoyancy and prevents swamping. The Dakota Quest offers a rated maximum capacity of three hundred fifty-two pounds. Safe paddling guidelines recommend following the seventy to seventy-five percent capacity rule, which sets the safe operational limit between two hundred forty-five and two hundred sixty-four pounds. Overloading lowers your freeboard, making the boat sluggish and far harder to remount if you take a spill.
Checking your tracking hardware after re-entry ensures smooth handling on your return paddle. The large detachable skeg on the Dakota Quest provides vital directional control in wind and chop. If the skeg came loose during the incident, the boat will wander off course and require constant corrective strokes. Adjust your paddle technique with wider sweep strokes if the skeg is missing to maintain forward progress.
Equipment Care, Storage, and Hull Maintenance
Regular post-trip maintenance protects your inflatable hull and keeps valves operating reliably. Sand and silt can easily enter spring-loaded valves, causing slow pressure leaks that soften chambers on future outings. Always rinse the hull with fresh water after paddling, clear any grit from the valve seals, and let the fabric dry thoroughly. Properly maintained valves ensure firm inflation, which is your main defense against capsizing.
Transport and storage flexibility is a primary benefit of choosing an inflatable paddlecraft. While rigid polyethylene boats require specialized kayak roof storage and transport systems to prevent hull warping, this inflatable folds into its included travel backpack. Storing the pack in a cool, dry room shields the PVC from excessive heat that can degrade seam adhesives. A well-stored inflatable remains ready for quick inflation without risk of material degradation.
Drying the deck thoroughly before storing prevents mildew and protects structural seams. Moisture trapped inside packed vinyl can weaken high-stress bond lines and produce unpleasant odors over time. Take a moment to wipe down the footrest, seat back, and accessory ports before rolling up the boat. These simple maintenance habits keep your kayak in prime condition for season after season of reliable use.
Practical Takeaways for Safe Solo Water Adventures
Deep-water recovery is a physical skill that improves dramatically with deliberate hands-on rehearsal. Take your kayak to a shallow, protected cove, intentionally roll out of the seat, and practice your horizontal kick and chest slide. Rehearsing both standard side scrambles and heel-hook entries builds genuine confidence and eliminates panic during unexpected spills. Knowing how your boat reacts under dynamic weight makes every solo journey safer.
Respecting weight limits, securing your paddle, and wearing a quality life vest ensure you stay safe on open water. Practicing your recovery steps transforms an accidental spill into a minor pause rather than a dangerous ordeal. Consistent preparation and good technique let you explore new waterways with complete peace of mind.
About the author
Sara James is an experienced paddler and outdoor gear reviewer with more than two decades of involvement in paddle sports. Her background spans touring kayaking, Class V whitewater, stand-up paddleboarding, and international kayaking events. She brings a practical, experience-driven perspective to evaluating kayaks, paddles, life jackets, dry bags, and other essential water gear.