
How to Get in and out of a Kayak Easily: A Practical Guide for 2026
Learn how to get in and out of a kayak easily from shores and docks in October 2026 with practical body balance, gear tips, and safe boarding mechanics.
 By Marius Fox
Updated October 5, 2026
By Marius Fox
Updated October 5, 2026
Learning how to get in and out of a kayak easily remains one of the most intimidating hurdles for new paddlers and experienced boaters alike. Kayak hulls are inherently dynamic craft designed to balance across fluid surfaces, which means boarding or disembarking can quickly lead to unexpected wobbles or capsizes. Mastering proper body mechanics, weight distribution, and leverage points transforms this awkward struggle into a smooth, dignified routine. Whether you paddle open sit-on-top platforms or enclosed recreational sit-in kayaks, understanding how your body interacts with hull displacement prevents waterlogged clothing and bruised pride.
Entering and exiting safely also requires adapting your technique to different shoreline topographies, floating docks, and unexpected open-water recoveries. Equipment choices play a significant role in overall boarding confidence, ranging from stable pontoon hull designs to aftermarket inflatable outrigger systems that eliminate side-to-side roll. Paddlers who respect their boat center of gravity and maintain disciplined points of contact can handle virtually any launch environment without anxiety. This practical guide covers proven launch methods, cockpit transitions, equipment aids, and essential safety protocols to keep every paddling excursion stable from start to finish.
| Award | Product | WSG Score About WSG ScoreThe WSG Score is our own rating from 0 to 10, based on performance, design and build, ease of use, and value. It reflects independent research and is never influenced by manufacturers, retailers, or affiliate commissions. Learn more › | |
|---|---|---|---|
| Best Overall |
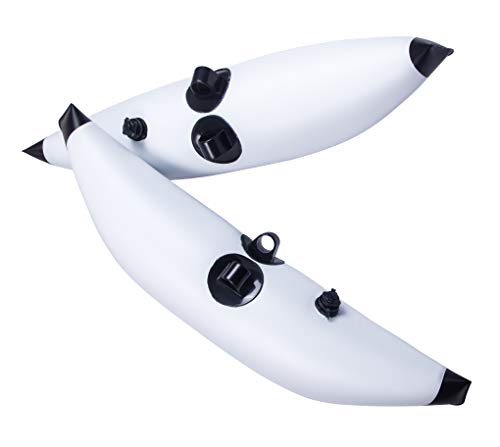
METER STAR Kayak Outrigger Stabilizers (2-Pack)
|
8.8/10 | Buy |
METER STAR Kayak Outrigger Stabilizers (2-Pack)
Designed to enhance watercraft balance for beginners and anglers, these lightweight PVC outriggers secure directly to paddle shafts to provide extra buoyancy. Quick-release valves and an adjustable height mechanism make them easy to transport and deploy on the water.
Pros
- Lightweight build at only 2.6 pounds
- Rapid deflation via turn-knob valve
- Includes four puncture repair patches
- Adjustable height with twist-and-click lock
Cons
- Lacks integrated D-rings or pad eyes
- Low maximum inflation ceiling of 4 PSI
Mastering Kayak Entry and Exit: Mechanics, Environments, and Stability Solutions
Executing a controlled entry or exit requires understanding how a kayak hull interacts with human weight. Most capsizes during boarding happen because the paddler shifts their center of gravity beyond the hull primary stability threshold. By following proven methods tailored to specific launch environments, you can step aboard with total confidence. The fundamental secret lies in keeping your hips loose, lowering your body mass immediately, and securing balance points before lifting your feet off solid ground.
Hydrodynamic Stability: Center of Gravity and Pivot Mechanics
Every kayak possesses two distinct phases of stability that dictate how it responds to body movement. Primary stability refers to how steady the watercraft feels when resting flat on calm water. Secondary stability represents the boat resistance to overturning as it tilts onto its side chines or gunwales. When boarding, paddlers encounter primary stability at its most vulnerable moment because their standing weight sits elevated far above the waterline.
A kayak acts like a floating balance beam that pivots around its central keel line. Standing upright raises your center of gravity, which amplifies any minor foot tremor into a violent tilt. Your body mass should always remain as low and central as possible throughout the boarding sequence. Resting your weight on the bottom of the hull rather than the raised gunwales immediately engages the natural buoyancy of the watercraft.
Maintaining three distinct points of physical contact during transitions prevents accidental slips and sudden weight shifts. These contact points typically involve two hands gripping stable surfaces while one foot supports your weight. Smooth, deliberate movements allow hull displacement to adjust gradually beneath you as your weight transfers onto the floor. Never attempt to lunge or jump into the seat from the bank or dock.
Shoreline and Shallow Water Entry: Straddle and Slide Techniques
Shallow water shorelines provide the safest environment for beginners learning to enter a boat without tipping. Position the kayak in calf-deep water so the hull floats freely above the sand or pebbles. Launching from dry sand may seem appealing, but dragging a loaded boat across abrasive rocks damages the bottom plastic and strains shoulder joints. Align the kayak parallel or slightly angled to the shoreline depending on surf or tidal movement.
The straddle technique is the most reliable method for beach and soft bottom launches. Stand directly over the kayak cockpit with one foot on either side of the hull in the shallow water. Lower your backside directly into the seat while gripping the cockpit coaming or side grab handles for support. Once your seat is firmly planted and your center of gravity rests low, lift your legs one at a time over the gunwales and slide them into the footwells.
Exiting on a shallow shoreline follows the reverse sequence to ensure you remain completely upright. Paddle into calf-deep water until the boat decelerates gently, avoiding slamming the bow hard onto the beach. Swing both legs over opposite sides of the kayak so your feet rest firmly on the submerged bottom. Lean forward from your hips, grasp the gunwales, and push your body upward in one fluid motion to stand straddling the centerline before stepping onto dry ground.
Dock Boarding: The Paddle Bridge Technique on Floating Piers
Low floating docks remain a common access point for paddlers, yet they often cause anxiety due to vertical movement between the dock and hull. Position the kayak parallel against the edge of the dock and pull it snugly alongside. Place your paddle across the deck immediately behind the seat coaming so that one blade rests flat on the dock surface. The paddle shaft now functions as a temporary outrigger, resisting any inward or outward roll toward the water.
Grip the paddle shaft and the cockpit coaming together with your shore-side hand while pressing down firmly to lock the blade against the decking. Place your waterside foot directly onto the floor of the kayak along the center keel line. Lower your hips down into the kayak seat smoothly while keeping your upper body weight leaning slightly toward the dock support. This deliberate weight bias prevents the kayak from sliding outward into open water beneath your feet.
Once your rear is fully supported by the seat base, bring your dock-side leg into the cockpit and settle your feet onto the foot braces. Stowing the paddle securely in your hands prepares you to shove gently away from the platform. Exiting onto a floating dock reverses this procedure by securing the paddle bridge behind the seat, sliding your hips up to gunwale level, and stepping smoothly onto the wooden pier.
Negotiating High Docks, Concrete Bulkheads, and Pier Landings
High fixed docks and municipal concrete bulkheads present a formidable challenge because the boarding surface may sit several feet above the waterline. These environments eliminate the possibility of using standard paddle bridges and require careful leverage control. Always secure a bow and stern painter line to dock cleats using quick-release hitches to keep the boat from drifting out of reach. Never step down onto the kayak from a standing posture on a high bulkhead.
Sit down on the edge of the high dock directly above the kayak cockpit with your legs dangling over the water. Place both hands flat on the dock surface on either side of your hips to support your full body weight. Lower your torso downward until your feet make contact with the kayak floor along the centerline of the craft. Keep your arms bent and engaged on the dock edge until your hips lower into the seat, ensuring you do not drop your weight abruptly.
When returning to a high pier, approach the wall parallel and grasp vertical pilings or dock ladders to arrest forward momentum. Release your legs from deep thigh braces and pivot your body sideways in the seat to face the structure. Place your hands firmly onto the lower rungs of the ladder or the top edge of the bulkhead. Push upward through your legs and pull with your arms simultaneously, lifting your torso out of the cockpit without pushing the kayak away with your feet.
Cockpit Geometry: Sit-On-Top Platforms versus Sit-Inside Designs
Hull style drastically alters how you enter and exit a paddlecraft due to differences in deck openness and seat positioning. Sit-on-top kayaks feature completely open, molded deck layouts that allow paddlers to board from virtually any angle, including side-saddle positions. These craft incorporate self-bailing scupper holes that quickly drain any water splashed aboard during boarding transitions. Elevated stadium seats common on fishing models provide knee comfort, though they slightly raise your center of gravity during launches.
Sit-inside models offer an enclosed cockpit surrounded by a raised coaming rim designed to accept waterproof spray skirts. Paddlers using stable solo sit-in kayaks benefit from a lower seating position directly on the hull floor, which enhances secondary stability once seated. Entering an enclosed cockpit requires threading your legs forward beneath the deck while keeping your torso upright. Restricted legroom makes flexible hip joints and measured movements essential for avoiding snags on internal foot braces.
Wearing a neoprene or nylon spray skirt on an enclosed boat requires strict cockpit entry discipline. Fold the rear skirt tunnel upward toward your chest before sitting down to prevent catching the material under your hips. Once seated comfortably, slide your feet onto the foot pegs and check that the emergency grab loop remains fully exposed on the outside of the coaming rim. An entrapped release strap can delay an emergency wet exit if an unexpected capsize occurs near the launch site.
Deep-Water Re-Entry and Open-Water Recovery Protocols
Accidental capsizes far from a welcoming shoreline require confident deep-water re-entry skills to regain your seat safely. If you capsize an enclosed boat, perform a calm wet exit by tucking forward, sliding your hands along the coaming to find the release loop, and pushing the boat away as you slide out. Always maintain physical contact with your kayak and paddle, as offshore winds can push an empty boat across the surface faster than a swimmer can follow. Right the overturned hull by reaching across the bottom, grabbing the opposite gunwale, and pulling back toward your chest.
The belly-scramble re-entry is the standard recovery method for sit-on-top boats floating in deep water. Position yourself near the center seat area, reach across the deck to grab the far edge, and deliver a vigorous scissor kick with your legs to propel your chest onto the seat. Once your belly rests flat across the deck, stay low like a seal and rotate your hips so your legs swing onto the deck. Sliding your torso upward into a seated position restores your center of gravity without tilting the hull violently.
Re-entering an enclosed sit-inside craft in deep water typically demands a paddle float or heel-hook maneuver to lift your torso above the swamped coaming. Carrying safety equipment mandated by US Coast Guard regulations under Title 33 CFR part 175 ensures you remain afloat during these physically taxing maneuvers. Always wear an approved Type III or Type V life jacket equipped with a pea-less whistle so passing vessels can hear your distress signal if cold water impairs your recovery attempts.
Mechanical Stability Solutions: Inflatable Outriggers and Floats
Paddlers with limited knee mobility, balance concerns, or fishing setups often rely on mechanical stabilizing floats to eliminate boarding wobble. The METER STAR 2Pcs Kayak Inflatable Outrigger provides an effective aftermarket solution that widens the effective beam of your boat. Manufactured from durable PVC raw materials, these buoyant pontoon floats act as counterweights against side-to-side tipping during entry and exit. Adding external buoyancy transforms narrow, tippy hulls into rigid platforms suitable for standing, casting, and relaxed recreational boarding.
The METER STAR stabilizer system features an inflatable, lightweight design where two floats weigh only 2.6 lbs, preserving your boat handling without adding deadweight. Each float measures approximately 90 cm (35.4 inches) in length and 28 cm (11 inches) in width, providing ample displacement along the waterline. The units inflate easily with a few breaths or a hand pump up to a working pressure limit of 4 PSI (0.3 BAR). A quick-release knob switch allows paddlers to deflate the buoys within seconds for compact transport and storage, and the package includes 4 repair patches for long-term maintenance.
Mounting versatility is another notable benefit of this inflatable outrigger design for both canoes and kayaks. The hardware supports adjustable float height using a simple twist-and-click mechanism that lets you raise the floats for smooth paddling glide or lower them for maximum boarding resistance. The two-piece brackets are engineered to clamp universally onto paddle shafts without requiring permanent D-rings or pad eyes drilled into your hull. This secure clamp setup holds the outriggers firmly in place, giving beginners and anglers the peace of mind they need to step aboard without tipping fears.
Pre-Launch Ergonomics, Footwear, and Safe Payload Distribution
Physical preparation and proper staging play an understated role in executing smooth entries and exits. Wearing grippy neoprene booties or specialized water shoes protects your soles from sharp shells while providing friction on slippery launch ramps. Stiff or slick footwear causes sudden slips that can send your feet shooting out from beneath you as you step onto the wet deck. Taking a few seconds to stretch your hamstrings and hip flexors on the shore makes sliding into tight cockpit openings significantly easier.
Organizing your gear before stepping into the boat is crucial for maintaining proper balance and waterline trim. Heavy items such as coolers, battery boxes, and dry bags should be stowed low and centered within storage tankwells rather than perched high on deck bungees. Keeping your total paddler and equipment weight within 70 to 75 percent of the manufacturer maximum weight capacity preserves necessary freeboard along the gunwales. An overloaded boat sits dangerously low in the water, making it far more susceptible to swamping during awkward entry transitions.
Transporting your craft carefully to the water edge also preserves its structural integrity for safe boarding. When unstrapping your boat from heavy-duty kayak racks, use a padded cart or two-person carry to avoid dragging the plastic bottom across coarse gravel. A gouged or deformed hull can track poorly and wobble unpredictably when you attempt to balance along its center keel line. Staging your paddle, water bottle, and life jacket in their designated spots beforehand ensures your hands remain free to control the boat during the critical launch phase.
Frequent Boarding Pitfalls and How to Prevent Capsizing
Most launching mishaps stem from a few predictable errors that compromise the natural balance of the watercraft. The most common mistake involves stepping directly onto the gunwale edge or cockpit rim rather than pressing down onto the center keel. Putting full body weight on an elevated rim acts as a high-torque lever that instantly flips the kayak underneath you. Always place your footwear directly along the middle stringer of the floor where the hull displacement is deepest.
Another frequent error is standing completely upright in the cockpit with rigid, locked knees while trying to adjust clothing or seat straps. Locked legs transmit every ripple and boat wake directly to your upper torso, causing rapid loss of balance. Maintain soft, bent knees and keep your head aligned over your belt buckle whenever you must momentarily stand or shift posture. If you ever feel the kayak begin to wobble violently, immediately drop your hips down toward the seat rather than reaching outward for support.
Ignoring environmental forces like wind and tidal current during dock launches often leads to awkward falls. A stiff offshore breeze can push an unconstrained kayak away from the dock face before your second foot leaves the platform, straddling you across an expanding gap. Always secure the boat against the dock edge using a painter line or firm hand grip until your body is fully seated. Remaining patient and moving deliberately will eliminate rushed mistakes and keep your gear dry every time you hit the water.
Launch Verification Checklist and Final Takeaway
Before paddling out from the launch zone, perform a quick physical safety check to verify your setup. Confirm that all scupper plugs or hull drain bungs are securely fastened to prevent slow cockpit flooding while underway. Verify that your life jacket buckles are cinched snugly around your torso and that your paddle blades face the correct driving orientation. Taking thirty seconds to check these details while resting in calm, shallow water guarantees a seamless transition into your paddling journey.
Learning how to enter and exit a kayak smoothly is a mechanical skill that improves rapidly with structured repetition. By respecting your center of gravity, maintaining reliable contact points, and utilizing stability aids like outriggers when appropriate, any paddler can overcome launch anxiety. Practice these straddle and paddle-bridge techniques in waist-deep water on a warm afternoon until they become second nature. With a disciplined approach and the right equipment, you can embark on every paddling adventure with complete peace of mind.
About the author
Marius Fox brings extensive hands-on experience from both above and below the water. A PADI Master Scuba Diver Trainer and AIDA freediver, she has worked as a scuba instructor, managed diving operations, participated in shark research, and contributed to marine conservation projects. His expertise provides a practical perspective on diving, snorkeling, water safety, and adventure gear.