
How to Get in a Kayak From a Dock: Practical Guide for 2026
Master how to get in a kayak from a dock with safe boarding techniques and stability tips in this practical paddling guide updated for October 2026.
 By Sara James
Updated October 5, 2026
By Sara James
Updated October 5, 2026
Stepping from a solid wooden surface onto a narrow, floating paddlecraft often presents the most nerve-wracking moment of any recreational paddling excursion. Because recreational hulls react instantly to shifting mass, learning how to get in a kayak from a dock requires a deliberate understanding of hull balance, contact points, and center of gravity. Whether boarding from a modern low-profile floating pontoon or a towering fixed timber pier, misjudging your footing can push the boat outward and leave you struggling in the water before your trip even begins.
Proper dockside boarding relies on maintaining continuous three-point contact while transferring your weight strictly along the boat centerline. Paddlers navigating enclosed cockpits on a single sit-in kayak must also manage coaming clearance, while sit-on-top paddlers must account for higher seat perches and open gunwales. By coordinating your body mechanics, utilizing paddle outrigger bridges, and staging your safety gear in advance, you can transition from the dock planks into your kayak seat with total poise and stability.
| Award | Product | WSG Score About WSG ScoreThe WSG Score is our own rating from 0 to 10, based on performance, design and build, ease of use, and value. It reflects independent research and is never influenced by manufacturers, retailers, or affiliate commissions. Learn more › | |
|---|---|---|---|
| Best Overall |
METER STAR Kayak Outrigger Stabilizers (2-Pack)
|
8.8/10 | Buy |
METER STAR Kayak Outrigger Stabilizers (2-Pack)
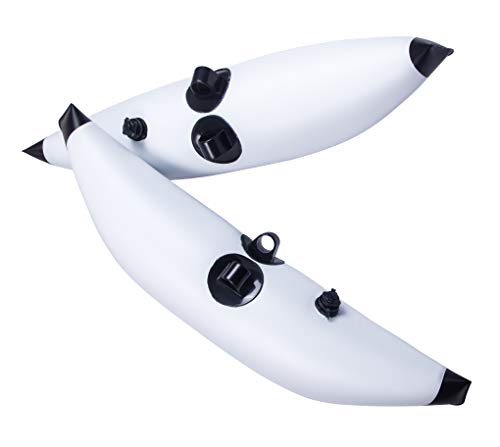
Designed to enhance watercraft balance for beginners and anglers, these lightweight PVC outriggers secure directly to paddle shafts to provide extra buoyancy. Quick-release valves and an adjustable height mechanism make them easy to transport and deploy on the water.
Pros
- Lightweight build at only 2.6 pounds
- Rapid deflation via turn-knob valve
- Includes four puncture repair patches
- Adjustable height with twist-and-click lock
Cons
- Lacks integrated D-rings or pad eyes
- Low maximum inflation ceiling of 4 PSI
Dockside Kayak Entry: Mechanics, Techniques, and Safety Guidelines
Entering a kayak from an elevated platform tests balance far more than launching from a gently sloping sand shoreline. Because the dock remains completely fixed while the watercraft floats freely upon the water, any lateral push forces the hull sideways into open water. Mastering how to get in a kayak from a dock involves eliminating unwanted sideways forces, keeping your body weight centered over the keel line, and maintaining firm handholds until you sit securely. Understanding these physical principles prevents unexpected capsizes and builds lasting confidence for every paddling adventure.
Assessing Dock Height and Hull Freeboard Dynamics
Dock architecture varies dramatically across public boat launches, private marinas, and municipal waterfront parks. Low floating docks sit mere inches above the water surface, matching the freeboard height of most recreational kayaks and allowing a relatively straightforward step down. Fixed timber docks, by contrast, accommodate larger motorized vessels and may tower several feet above your kayak gunwales, especially during low tides. Assessing the vertical distance between the dock planks and your kayak cockpit before boarding dictates whether you can use a parallel step-in technique or must lower yourself from a seated position.
Tidal drops and water currents add another layer of complexity to your dock assessment. A dock that offered an easy step-in during high tide might leave a steep vertical bulkhead drop a few hours later. Strong river currents or passing motorboat wakes can pin the kayak against dock pilings or suck it underneath the walkway. Inspecting the pilings for sharp barnacles, protruding rusty hardware, and splintered wood preserves your boat hull and protects your hands during the entry sequence.
Equipment Positioning and Cockpit Staging
Pre-boarding preparation plays a vital role in executing a smooth, spill-free dock launch. Never attempt to step into your kayak while holding loose dry bags, heavy tackle crates, or water bottles in your hands. Stow all loose gear in the bow and stern storage wells or secure it under bungee deck lines while the boat remains moored safely alongside the pier. Your personal flotation device must be fully zipped, clipped, and cinched snugly to your torso before you approach the dock edge, satisfying safety protocol and keeping your hands free.
Paddle staging requires strategic thought to avoid dropping expensive shafts into deep marina water. Place your paddle across the kayak cockpit coaming or gunwales parallel to the dock where your hands can easily reach it once you are seated. Some paddlers prefer laying the paddle flat on the dock surface within arms reach so they can grasp it after settling into the cockpit seat. Whichever staging method you choose, make sure the paddle does not roll freely or obstruct the footwell where your feet must plant.
Low Floating Dock Entry: Step-by-Step Parallel Method
A low floating dock provides the friendliest conditions for boarding a kayak because the dock moves naturally with the water surface. Start by bringing your kayak completely parallel to the dock edge so the cockpit aligns directly beside your knees. Position yourself facing the bow of the boat, crouching low to keep your center of mass close to the timber decking. Grip the dock edge firmly with the hand closest to the pier, and place your outer hand on the kayak coaming or gunwale directly on the boat centerline.
Lift the foot closest to the boat and place it firmly onto the bottom floor of the kayak along the middle keel line. Never place your foot on the raised gunwales or outer edges, as pressing down on the side will tilt the hull and initiate an immediate capsize. Once your lead foot feels secure, transfer your remaining weight in one smooth motion down into the kayak seat while bringing your trailing foot aboard. Keep your hips low, avoid standing upright at any moment, and only release your grip on the dock once your backside rests firmly in the seat.
Boarding from High Fixed Piers and Bulkheads
Launching from high seawalls, commercial bulkheads, or fixed pier decks requires an entirely different physical approach than low pontoons. When the drop from the dock to the kayak seat exceeds your leg reach, attempting to step down feet-first will push the boat out from under you. Instead, pull the kayak tight against the bulkhead using a bow line or painter line secured with a temporary slip knot. Sit down flat on the edge of the dock planks with your legs dangling over the water directly above the cockpit opening.
Place both hands flat on the dock surface on either side of your hips, supporting your upper torso weight on your palms. Lower your feet down into the kayak cockpit, guiding the hull gently with your heels until both soles rest squarely along the centerline floor. Lower your torso down the face of the dock by extending your arms and sliding your hips off the deck planking until your backside makes solid contact with the seat. If you are paddling a heavy-duty inflatable kayak, the wide buoyancy tubes offer generous initial stability against the pier wall, cushioning any contact during your descent.
The Paddle Bridge Stabilization Method
The paddle bridge technique transforms your standard double-bladed paddle into a temporary stabilizing outrigger during dock entry. Lay your paddle shaft horizontally directly behind the cockpit rim so that one blade extends flat across the dock planks while the other blade hovers over the open water. As you stand or crouch on the dock, grab both the paddle shaft and the rear coaming rim with your dock-side hand in a single firm clamp. This mechanical connection prevents the kayak from rolling outward or drifting away from the pier.
Place your outside hand on the paddle shaft just outboard of the kayak cockpit to create a rigid triangular support frame. Step your lead foot into the cockpit floor, keeping your weight leaning slightly toward the dock-supported paddle blade to counteract tipping forces. Slide your legs into the cockpit beneath the front deck, lower your hips into the seat, and lift the paddle cleanly from behind your back. If you use a lightweight composite paddle, support most of your mass with your dock hand resting directly on the wooden decking rather than bearing down solely on the paddle tube.
Using Outrigger Floats for Uncompromising Dockside Balance
Paddlers managing balance challenges, recovering from joint injuries, or operating loaded fishing rigs often seek auxiliary mechanical stability for dockside boarding. Adding a reliable aftermarket pontoon system like the METER STAR 2Pcs Kayak Inflatable Outrigger creates an exceptionally stable platform that dramatically reduces primary hull tipping. Built from durable PVC raw materials, these dual inflatable floats weigh just 2.6 pounds for the pair, keeping your overall boat setup light and portable. The floats measure approximately 35.4 inches in length by 11 inches in width, creating substantial reserve buoyancy right at the water surface.
Operating at a maximum pressure of 4 PSI (0.3 bar), these inflatable pontoons inflate quickly and deflate in seconds via an integrated knob switch. The included four repair patches offer peace of mind around rough wooden pilings, while an adjustable twist-and-click mechanism allows custom height tuning. Because the stabilizer arms feature a universal clamp design that fits standard paddle shafts, paddlers can secure a wide outrigger footprint without drilling permanent hull holes. When stepping from a high wooden pier, this outboard buoyancy acts as a secondary hull that resists rotational torque and prevents capsizes.
Sit-Inside vs Sit-On-Top Cockpit Dock Entry Differences
The physical design of your kayak cockpit dictates the specific legwork and balance mechanics required during dock boarding. Sit-inside kayaks position the paddler below the waterline inside an enclosed cockpit, which lowers your center of gravity and enhances secondary stability once you are seated. However, slipping your legs beneath the foredeck requires bending your knees and sliding forward, which can feel cramped when managing lines alongside a pier. If you plan to wear a neoprene or nylon spray skirt, secure the skirt tunnel around your torso before stepping down, keeping the rand free so it does not catch on the dock edge.
Sit-on-top kayaks feature an open deck architecture with self-bailing scupper holes, making it remarkably simple to swing your legs aboard without squeezing into an enclosed rim. The trade-off is an elevated seating position that raises your center of mass higher above the boat waterline. Transporting your vessel to the launch also requires suitable equipment, and utilizing dedicated kayak transport and storage racks keeps your hull true and free from bottom-hull oil-canning before you even reach the water. When your boat retains its intended hydrodynamic shape, tracking and stability remain completely predictable every time you push away from the dock.
Common Dock Launching Mistakes and Capsize Prevention
The most frequent mistake made during dock entry is pushing the kayak laterally away from the pier with the lead foot. When a paddler stands tall on the dock and steps into the boat without locking their hands to the dock edge, their leg acts like a lever that pushes the hull outward into the slip. This creates an unavoidable split where the paddler’s feet drift wider apart until balance is lost and immersion occurs. You can completely eliminate this error by keeping your hips bent, staying low, and clamping the dock planking with your dock-side hand throughout the entire step.
Stepping directly onto the slippery plastic gunwales or elevated cockpit rims instead of the sunken hull floor is another frequent error. Polyethylene and thermoformed plastic surfaces become exceptionally slick when wet, offering virtually zero traction for bare feet or rubber-soled water shoes. Applying downward pressure to the gunwale also drives one side of the boat underwater, creating an acute angle that quickly dumps the craft. Always aim your foot directly at the center floor stringer or footwell channel where the boat displacement provides maximum resistance to rolling.
Dock Exit Protocols: Reverse Techniques for Safe Landing
Exiting your kayak onto a dock requires executing the boarding sequence in reverse with equal focus and deliberate body control. Approach the dock slowly at a shallow angle, coasting parallel to the landing area rather than ramming the bow straight into the wooden structure. Stow your paddle securely on the dock planks or across your cockpit coaming where it will not roll away as you prepare to disembark. Pull the boat snug against the dock edge, grabbing a cleat or solid timber board with your dock-side hand to stabilize the hull.
Shift your torso forward so your weight rests over the seat front edge, placing your dock hand flat on the pier decking and your outside hand firmly on the kayak centerline. Press down through your arms and legs simultaneously, elevating your hips out of the seat while keeping your upper body angled slightly toward the dock surface. Slide your hips smoothly from the kayak seat directly onto the edge of the dock planks, avoiding any temptation to stand up straight inside the floating boat. Once your backside rests securely on the dock boards, swing both legs out of the cockpit, pivot onto your feet, and secure your painter line with a proper cleat hitch.
About the author
Sara James is an experienced paddler and outdoor gear reviewer with more than two decades of involvement in paddle sports. Her background spans touring kayaking, Class V whitewater, stand-up paddleboarding, and international kayaking events. She brings a practical, experience-driven perspective to evaluating kayaks, paddles, life jackets, dry bags, and other essential water gear.