
How to Get Back Into an Inflatable Kayak: Practical Guide for 2026
Learn how to get back into an inflatable kayak safely with essential self-rescue steps, body mechanics, and open-water recovery methods for October 2026.
 By Brooke Hess
Updated October 5, 2026
By Brooke Hess
Updated October 5, 2026

Capsizing away from shore quickly tests a paddler’s composure and physical technique. While air-filled side tubes offer exceptional initial buoyancy, learning how to get back into an inflatable kayak requires understanding how buoyant pontoons behave under shifting body weight. Unlike rigid plastic hulls with defined chines, an inflatable kayak can roll beneath your chest if you pull straight downward against the gunwale. Exploring reliable recovery methods helps you stay safe, especially when paddling durable inflatable kayaks on open reservoirs or breezy lakes.
Mastering on-water re-entry prevents an inconvenient spill from turning into an emergency. Whether you paddle an open-deck craft or an enclosed model, knowing how to stabilize the hull, kick your legs horizontally, and leverage built-in perimeter lines makes all the difference. Proper preparation also means wearing a properly fitted personal flotation device and understanding equipment limitations before venturing into deeper water. With practical self-rescue techniques, you can regain your cockpit smoothly and continue your paddling excursion with confidence.
| Award | Product | WSG Score About WSG ScoreThe WSG Score is our own rating from 0 to 10, based on performance, design and build, ease of use, and value. It reflects independent research and is never influenced by manufacturers, retailers, or affiliate commissions. Learn more › | |
|---|---|---|---|
| Best Overall |
JAYEGT Inflatable Kayak Seat
|
9.2/10 | Buy |
 Bestway Hydro-Force Rapid X3 3-Person Kayak
|
8.6/10 | Buy | |
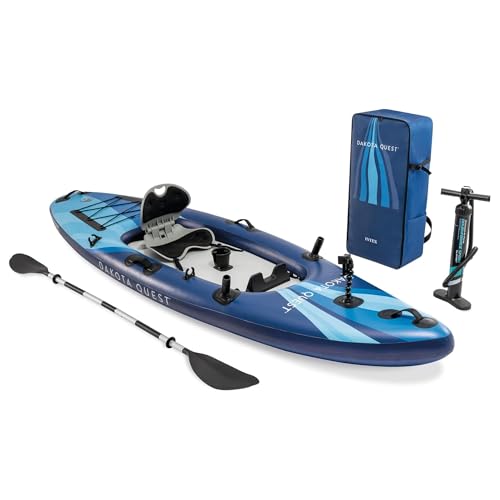 Intex Dakota Quest 10.5ft Inflatable Kayak
|
8.4/10 | Buy |
JAYEGT Inflatable Kayak Seat
Paddlers seeking portable comfort will appreciate this foldable cushion, which delivers 3.94 inches of inflatable support for extended days on the water. Its adjustable metal-buckle straps keep the seat anchored across sit-on-top kayaks, paddle boards, and canoes.
Pros
- Thick 3.94-inch cushion dampens hard surfaces
- Metal buckles ensure a firm and stable mount
- Folds down small for effortless transport
- Contoured shape provides dedicated lumbar support
Cons
- Air pump is not included in the box
- Requires dedicated inflation before each outing
Bestway Hydro-Force Rapid X3 3-Person Kayak
Built for group outings, this 12-foot inflatable kayak accommodates up to three adults with a supportive 551-pound capacity. Its puncture-resistant Inflata-Shield construction and dual removable fins deliver reliable tracking and stability on calm waters.
Pros
- High 551-pound load capacity accommodates three paddlers
- Durable Inflata-Shield material resists tears and punctures
- Two swappable fins improve directional control
- Includes hand pump, carrying bag, and repair patch
Cons
- Supplies only two paddles for a three-person boat
- Relatively heavy to carry alone at over 41 pounds
Intex Dakota Quest 10.5ft Inflatable Kayak
Designed for recreational paddlers and casual anglers, this sit-on-top inflatable kayak features a wide, buoyant deck with integrated rod and camera mounts. Its elevated seat and all-inclusive accessory kit make it a convenient option for calm lake excursions.
Pros
- All-in-one package includes pump, paddle, and carry bag
- Elevated seat keeps paddlers comfortable above the waterline
- Wide profile offers dependable primary stability for beginners
- Integrated mounts easily accommodate fishing and camera gear
Cons
- Manual hand pump requires physical effort before launching
- 352-pound limit restricts heavier paddlers carrying extra gear
- Large tracking skeg can catch in shallow water
Essential Techniques for Re-Entering an Inflatable Kayak in Deep Water
Capsizing an inflatable watercraft in deep water presents unique mechanical challenges compared to rigid composite or rotomolded boats. Inflatable side chambers provide immense buoyancy that resists sinking, yet they can easily spin or pivot under uneven body weight. Understanding how to manage these buoyant sponsons ensures you can self-rescue quickly without exhausting your physical energy. Executing a clean recovery relies on horizontal body alignment, controlled kicking, and utilizing your craft’s structural rigging rather than sheer upper-body muscle.
The Hydrodynamic Behavior of Inflatable Pontoons During Re-Entry
Air-filled PVC and drop-stitch side tubes behave very differently than traditional hard-shell gunwales during an on-water recovery. A standard polyethylene kayak allows you to grip an edge and exert downward force without the hull rolling aggressively toward you. In contrast, an inflatable pontoon acts like a buoyant cylinder that easily rolls along its longitudinal axis when a paddler bears down directly on its top surface. Gripping only the nearest tube and attempting to pull yourself upward pushes the tube under water while lifting the opposite side, which often flips the craft directly onto your head.
Primary stability on an inflatable craft remains exceptionally high while your weight is centered across the floor. However, once you enter the water, the craft sits high on the surface with minimal draft depth. This high water profile makes the boat vulnerable to wind drift, separating you from your boat in seconds if you let go. Recognizing that the kayak will roll if weighted unevenly allows you to adjust your approach angle and distribute force horizontally across both side tubes.
Immediate Response: Securing Paddle, Craft, and Physical Composure
The first few seconds following an accidental capsize determine the success of your self-rescue. Cold-water shock can trigger an involuntary gasp reflex, so taking a breath before your face contacts the water is critical. Your immediate priority must be maintaining physical contact with both your kayak and your paddle. A sudden gust of wind can push a lightweight inflatable craft across the water faster than an average swimmer can pursue it while wearing paddling gear.
If your kayak has turned completely upside down, you must right the boat before attempting any re-entry maneuvers. Position yourself near the center of the hull, reach across the exposed bottom floor, and grip the perimeter line or far side tube. Place your knees against the near tube, lean your body weight backward into the water, and pull steadily to lever the craft right-side up. Inflatable hulls are lightweight and roll upright with far less resistance than waterlogged rotomolded boats, but you must keep a firm grip so the craft does not bounce away.
Securing your paddle preserves your means of propulsion once you scramble back aboard. Slip the paddle blade under the front deck bungee cords, or tether it securely to an accessory loop if your boat includes one. Leaving a loose paddle floating alongside risks losing it during the turbulence of your re-entry scramble. Once the craft is upright and your paddle is secured, orient your body toward the middle section of the kayak where buoyancy and beam width are greatest.
The Side-Scramble Method: Step-by-Step Re-Entry Mechanics
The side-scramble serves as the primary deep-water recovery technique for both sit-on-top and open-cockpit inflatable kayaks. Begin by positioning your torso near the midship area, just behind the main seating station. Placing yourself too close to the bow or stern can submerge the tapered ends and cause the boat to slide out from under you. Keep your hands flat on the top of the nearest tube or grip the inner cockpit floor to prepare for your propulsion burst.
The single most important mechanical step is getting your legs and lower body horizontal on the water surface. If your legs hang vertically below you, you will fight gravitational drag and push the kayak underwater. Kick your feet vigorously behind you, similar to a strong flutter kick or dolphin kick, until your body planes flat along the waterline. This horizontal posture creates forward momentum and eliminates the dead weight of your lower body.
With your body swimming horizontally, deliver one powerful, explosive kick while pulling your chest across the side chamber. Reach your hands across to the opposite pontoon tube to distribute your upper-body weight across both air chambers simultaneously. By grasping the opposite tube, you prevent the kayak from rolling toward you and lock the hull in a stable, level position. Slide your stomach and hips across the gunwale until your center of gravity rests squarely over the center floor of the cockpit.
Once your abdomen is supported by the floor, pause briefly to catch your breath and verify your balance. Keeping your body as low as possible reduces the risk of tipping the craft back over. Slowly roll onto your back or swing your legs around one at a time into the seating area. Avoid standing up or raising your torso until your hips are firmly planted on the floor or seat cushion.
The Heel-Hook Re-Entry: Leveraging Lower-Body Power
Paddlers with limited upper-body strength or those experiencing shoulder fatigue often struggle with the raw pull of a standard scramble. The heel-hook method provides an effective mechanical alternative by utilizing the larger, stronger muscles of your legs. This technique works particularly well on wider inflatable kayaks that feature sturdy side tubes and low deck heights. It eliminates the need to press your entire body weight upward using only your arms and chest.
To initiate a heel hook, float parallel to the kayak cockpit while facing toward the stern. Reach one arm across the boat to grip the opposite pontoon or an interior grab handle, keeping your chest close to the near tube. Lift your outside leg and hook your heel over the near side pontoon, lodging your foot inside the cockpit footwell or against the opposite tube. This creates an anchor point that securely binds your lower body to the craft’s primary buoyancy chamber.
From this locked position, straighten your hooked leg and twist your hips in a continuous corkscrew motion. As your leg extends, it pulls your hips and torso upward and rolls your stomach onto the deck. Once your pelvis clears the side tube, slide your second leg aboard and pivot your body around into an upright seated posture. This rotational levering action requires minimal arm strength and maintains constant hull contact throughout the recovery.
Utilizing Built-In Rigging, Perimeter Grab Lines, and Webbing Stirrups
Many multi-chamber inflatable kayaks integrate specific hardware designed to assist during self-rescue operations. For example, craft like the Bestway Hydro-Force Rapid X3 feature continuous wrap-around grab ropes threaded through reinforced grommets along the outer perimeter. These grab lines provide essential handholds when cold water reduces finger dexterity, preventing the smooth, wet PVC material from slipping through your grip. When performing a scramble, pulling on these anchored lines provides stable leverage that bare fabric chambers cannot match.
If you lack the leverage to vault your chest over high-volume tubes, an improvised foot stirrup can bridge the gap. You can fashion a stirrup from a five-foot loop of heavy-duty nylon tubular webbing carried in your life jacket pocket. Secure one end of the webbing sling to a structural D-ring or pass it under the hull to the far-side carry handle. Adjust the bottom loop so it hangs approximately twelve to eighteen inches below the surface of the water.
Step one foot into the hanging stirrup loop while gripping the inner cockpit floor with both hands. Stand up in the stirrup as if climbing a ladder rung, immediately driving your chest horizontally across the boat floor rather than pushing downward. Keep your center of gravity low as soon as your hips cross the gunwale, and unhook your foot from the sling before settling into the seat. Never tie a stirrup permanently around your leg or foot, as you must be able to disengage instantly if the kayak shifts.
Sit-On-Top Versus Sit-Inside Inflatables: Drainage and Stability Differences
Cockpit architecture drastically influences how your boat behaves after you successfully climb back aboard. Open-deck sit-on-top configurations, such as the Intex Dakota Quest, feature self-draining scupper holes or elevated floor channels that shed excess water automatically. Unlike traditional single sit-in kayaks that capture hundreds of pounds of water during an open-cockpit capsize, a sit-on-top inflatable remains buoyant and functional even when waves splash across the deck. You can climb directly onto the flat floor without stopping to bail out flooded compartments.
Enclosed sit-inside inflatables retain water inside the hull, creating a dangerous condition known as the free surface effect. When loose water sloshes back and forth across the cockpit floor, it shifts the boat’s center of gravity rapidly and can trigger an immediate secondary capsize. If you paddle an enclosed cockpit craft, you must carry a compact manual bilge pump and a large marine sponge lashed inside the cockpit. Bailing water while maintaining stability requires staying low, keeping your knees wide against the side tubes, and pumping steadily until the floor is dry.
Seating systems also require attention during and immediately after your recovery. Aftermarket seats with adjustable support straps, such as the JAYEGT Inflatable Kayak Seat with Back, rely on tight brass or metal buckle tension to stay upright. A heavy scramble over the gunwales can dislodge loose seat clips or flatten uninflated seat cushions. Take a moment after boarding to snap support webbing back into place so proper lumbar posture and boat trim are restored before you resume paddling.
Essential Safety Outfitting and USCG Regulatory Compliance
Safe deep-water recovery begins with appropriate personal equipment worn before launching your boat. Under United States Coast Guard regulations codified in Title 33 CFR § 175, every paddler must carry a wearable Type III or Type V personal flotation device. A high-back paddling life jacket provides vital inherent buoyancy that keeps your airway clear while you kick into a horizontal scramble position. Attempting to execute a self-rescue without a secure PFD forces you to tread water and fight gravity, leading to rapid muscle exhaustion.
Federal navigation rules also mandate carrying an efficient sound-producing device, such as a pea-less safety whistle, attached directly to your life jacket. If repeated self-rescue attempts fail due to rough water, wind drift, or physical cramping, a whistle blast carries significantly farther than human vocal calls. You should also ensure that your safety equipment includes a high-visibility rescue tether or tow line if you plan to navigate coastal bays or tidal estuaries where currents overpower swimming efforts.
Practicing re-entry techniques in a calm, controlled environment builds the muscle memory necessary for real emergency situations. Spend time in warm, shallow water or a designated swimming zone testing both the side-scramble and heel-hook methods on your specific boat. In addition, keep in mind how you store and secure your gear at home or during transport; using dedicated heavy-duty kayak storage solutions prevents hull creasing and keeps high-pressure valves functioning smoothly season after season.
Critical Mistakes That Cause Re-Entry Failure on Inflatables
The most frequent error beginner paddlers make is attempting to climb over the side tube like pulling themselves out of a swimming pool. When you push down vertically on an inflatable pontoon, the buoyant air chamber compresses and rolls under the hull. This downward vector sinks the near side while catapulting the far side upward, dumping you straight back into the water. Success requires transferring your weight horizontally across both pontoons rather than pushing down on one.
Another dangerous mistake is exceeding the safe operating capacity of your inflatable craft. Manufacturers assign maximum weight ratings, but safe practice dictates maintaining a 25 to 30 percent reserve buoyancy buffer. Overloading an inflatable with heavy tackle boxes, coolers, or oversized gear lowers the boat’s freeboard and increases draft depth. A heavily weighted boat sits deep in the water, making it harder to roll back upright and significantly more prone to swamp during re-entry attempts.
Failing to monitor chamber air pressure also complicates recovery maneuvers on the water. When an inflatable craft enters cold lake water, thermal contraction causes the air inside the chambers to lose volume and pressure. Under-inflated pontoon tubes bend and fold in the middle when you put weight on them, robbing you of the rigid platform needed for a side-scramble. Always check valve tightness and verify proper working pressure before paddling away from the launch ramp.
Post-Rescue Cockpit Stabilization and Resuming Your Route
Once you are back inside the cockpit, stay low and avoid sudden shifts in body position while regaining your balance. Reconnect your paddle leash or untether your paddle from the deck bungees before sitting completely upright. Check your surrounding water for any floating gear or dry bags that may have detached during the initial spill. Take several deep breaths to lower your heart rate and assess your physical stamina before paddling against wind or current.
Inspect your hull chambers to verify that all valves remain closed and undamaged from the scramble. If your kayak took on water, use your bilge sponge or open the self-bailing scupper valves to clear the cockpit floor. If cold water immersion has caused shivering or loss of hand strength, point your bow toward the nearest safe shoreline immediately. Self-rescue is only complete once you have regained total control of your craft, secured your propulsion, and ensured your boat is structurally sound to travel.
About the author
Brooke Hess is an accomplished whitewater kayaker and outdoor writer with years of experience paddling rivers around the world. He has competed internationally in freestyle kayaking and extreme races and has represented the United States in competitive kayaking. His deep understanding of river conditions and paddling performance gives her valuable insight into technical kayaking gear.