
How to Build a Kayak Rack for Storage: Practical Guide for 2026
Master how to build a kayak rack for storage with practical steps, wall-mounting tips, and hull safety advice updated for October 2026. Protect your watercraft properly.
 By Edward Ting
Updated October 5, 2026
By Edward Ting
Updated October 5, 2026

Storing a kayak improperly on a bare concrete garage floor or resting it directly on its hull bottom often leads to permanent plastic deformation known as oil-canning. Understanding how to build a kayak rack for storage allows paddlers to protect their hulls, clear valuable floor space, and keep watercraft ready for quick weekend launches. Whether you choose to construct a custom timber frame from scratch or integrate modular steel brackets, proper weight distribution remains the foundation of watercraft preservation. Evaluating your available wall height, hull beam width, and wall stud spacing helps you choose between ceiling lifts, wall cradles, or freestanding systems.
Many paddlers start by measuring their watercraft beam and total rigged weight before picking materials or pre-engineered hardware kits. If building from lumber feels too time-consuming, installing manufactured heavy-duty kayak storage rack options into structural wall studs offers a dependable shortcut with certified load ratings. Taking time to pad every support arm with closed-cell foam or marine felt prevents gouging and distributes hull pressure evenly. A properly planned storage system keeps your investment safe through changing seasonal temperatures and prevents unnecessary clutter in your workspace.
| Award | Product | WSG Score About WSG ScoreThe WSG Score is our own rating from 0 to 10, based on performance, design and build, ease of use, and value. It reflects independent research and is never influenced by manufacturers, retailers, or affiliate commissions. Learn more › | |
|---|---|---|---|
| Best Overall |
EVERHANGER Wall-Mounted Kayak Rack (2-Pack)
|
8.9/10 | Buy |
| Best Value |
 UOKRR 4-Tier Wall Mount Kayak Storage Rack
|
8.9/10 | Buy |
| Best Premium |
 Morohope 4-Level Freestanding Kayak Storage Rack
|
8.6/10 | Buy |
 Morohope 6-Kayak Freestanding Storage Rack
|
8.3/10 | Buy | |
| Best Budget |
 RAD Sportz Kayak Hoist 2-Pack Garage Ceiling
|
8.1/10 | Buy |
 EVERHANGER Wall Mounted Kayak Storage Rack
|
8.1/10 | Buy | |
 RAD Sportz Surfboard & Kayak Wall Mount Rack
|
8.0/10 | Buy |
EVERHANGER Wall-Mounted Kayak Rack (2-Pack)
Constructed from industrial-grade powder-coated steel, this heavy-duty storage pair supports watercraft up to 200 pounds while freeing up valuable floor space. Thick EVA foam padding shields hulls from dents, and built-in lower hooks provide dedicated spots for paddles and gear.
Pros
- Strong 200-pound load capacity per pair
- Thick EVA foam shields gear from scratches
- Built-in bottom hooks store paddles conveniently
- Corrosion-resistant powder-coated steel construction
Cons
- Fixed arms do not fold away when empty
- Requires solid wall stud mounting for heavy loads
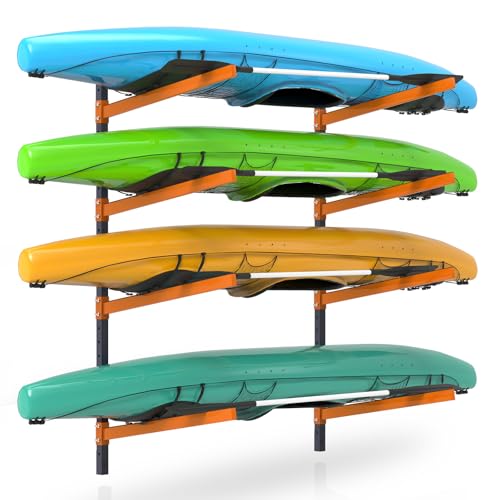
UOKRR 4-Tier Wall Mount Kayak Storage Rack
The UOKRR 4-Tier Wall Mount Kayak Storage Rack is an industrial steel organizer engineered to hold up to four watercraft with a robust 150-pound rating per level. Featuring weatherproof felt-padded arms and adjustable vertical spacing, it is an ideal storage upgrade for multi-boat paddlers looking to protect their hulls in a garage, shed, or dock.
Pros
- Sturdy 150-pound per level capacity reliably supports heavy rotomolded fishing kayaks and tandem hulls
- Weatherproof felt-covered arms prevent surface gouges and reduce contact friction on watercraft finishes
- Multiple rail adjustment points allow custom spacing to fit varying hull depths and gear cowlings
- Powder-coated steel build makes it versatile for indoor garage organization or outdoor dockside mounting
Cons
- Requires a 12mm drill bit for wall installation that is not included in the package
- Requires secure anchoring directly into wall studs or solid masonry to support multi-boat load weight safely
- Lifting heavier 70-to-80-pound fishing kayaks onto the top tier can be challenging for solo paddlers
Morohope 4-Level Freestanding Kayak Storage Rack
The Morohope 4-Level Freestanding Storage Rack organizes up to four watercraft with a stout 400-pound total capacity and protective felt padding. It is a dependable space-saving choice for multi-boat paddlers, kayak anglers, and families needing versatile indoor or outdoor garage and dock storage.
Pros
- Robust 400-pound total load capacity handles up to four heavy recreational or fishing kayaks at 100 pounds per level
- Protective felt-lined support arms safeguard plastic, fiberglass, and foam deck surfaces from scuffs and pressure scratches
- Fully freestanding design allows flexible positioning in garages, sheds, or outdoor docks without wall drilling
- Compact vertical footprint preserves floor area while organizing multiple paddlecraft cleanly
Cons
- Top-heavy when improperly loaded, requiring heavier watercraft to be placed strictly on the bottom tiers for balanced stability
- Deep 46-inch base footprint requires adequate floor clearance away from tight vehicle parking zones
- Outdoor dock use in wet or marine environments may require periodic inspection to preserve hardware and frame longevity over time
Morohope 6-Kayak Freestanding Storage Rack
Designed for multi-craft owners, this heavy-duty steel rack organizes up to six kayaks or paddleboards without requiring wall mounting. Protective felt padding shields watercraft hulls from scratches during indoor or outdoor storage.
Pros
- High 600-pound overall weight capacity
- Freestanding setup requires no wall drilling
- Protective felt padding prevents hull scratches
- Versatile storage for kayaks, SUPs, and surfboards
Cons
- At 44.7 pounds, fully assembled frame is cumbersome to move
- Wide base requires dedicated floor footprint
RAD Sportz Kayak Hoist 2-Pack Garage Ceiling
The RAD Sportz Kayak Hoist 2-Pack provides a reliable garage ceiling storage system with a 125-pound capacity per lift, designed to get kayaks, canoes, and ladders safely off the floor. Featuring an automatic locking rope brake, wide nylon straps, and rubber-coated hooks, it is an ideal storage upgrade for solo paddlers and multi-boat households.
Pros
- Convenient two-pack setup provides ceiling storage for two personal watercraft at an accessible price point
- Self-locking rope brake mechanism stops slippage instantly, making solo loading and unloading manageable
- Protective nylon straps distribute hull weight broadly to reduce the risk of bottom oil-canning during hot summer storage
- Rubber-coated attachment hooks prevent cosmetic scratching on composite, thermoformed, or polyethylene hulls
- Flexible ceiling bracket mounting works with both parallel and perpendicular joist layouts up to 12-foot heights
Cons
- Requires careful measurement and secure anchoring into structural ceiling joists with basic workshop tools
- The 125-pound maximum rating will not support oversized, fully rigged pedal fishing kayaks or heavy motorized rigs
- Ceiling joist spacing in some garages may require mounting a secondary wooden backing board for proper strap alignment
EVERHANGER Wall Mounted Kayak Storage Rack
The EVERHANGER Wall Mounted Kayak Storage Rack provides a heavy-duty steel, two-tier storage solution designed to keep kayaks off the floor and organized in garages or sheds. With height-adjustable, upward-angled support arms and a powder-coated finish, it is a practical choice for multi-boat paddlers looking to protect their hulls from ground damage and free up storage space.
Pros
- Heavy-duty powder-coated steel frame delivers dependable indoor or outdoor corrosion resistance
- Adjustable-height arms accommodate various kayak sizes, beam widths, and hull profiles
- Upward-angled support design keeps hulls seated securely to prevent accidental roll-offs
- Frees up valuable garage floor space by utilizing vertical wall storage for two boats
- Includes installation hardware for mounting directly into structural wall framing
Cons
- Requires secure anchoring directly into wall studs or solid masonry to support heavy rotomolded kayaks safely
- Steel support arms lack built-in thick foam padding to cushion bare hulls against scratches
- Lifting heavy fishing kayaks onto the top tier can be challenging for solo paddlers
RAD Sportz Surfboard & Kayak Wall Mount Rack
The RAD Sportz wall mount rack features heavy-duty powder-coated steel J-hooks with protective foam padding to keep surfboards, paddleboards, and kayaks safely off the ground. With a 100-pound load capacity per pair, it offers a practical, space-saving storage solution for surfers looking to prevent floor dings and garage clutter.
Pros
- Durable powder-coated steel frame delivers a solid 100-pound weight capacity per pair
- Protective foam padding cushions surfboard rails against direct contact and scratches
- Elevates boards off damp concrete floors to save vital garage space and prevent dings
- Includes mounting hardware and an instruction manual for simple stud installation
Cons
- Must be anchored directly into solid wall studs to safely support heavier watercraft
- Single pair stores only one large board or kayak at a time
- Supplied hardware may need upgrading for specialized masonry or metal stud walls
Building and Setting Up a Kayak Storage Rack for Long-Term Hull Protection
Building a dependable storage rack requires balancing structural stability, wall space efficiency, and long-term hull preservation. Rotomolded polyethylene, thermoformed plastics, and composite materials all react differently to localized pressure and seasonal temperature fluctuations. A poorly supported hull will gradually warp under its own weight, causing permanent hydrodynamic performance loss known as oil-canning. By selecting proper structural materials, locating secure anchor points, and padding every load-bearing contact surface, you can construct a storage setup that keeps your watercraft pristine for years.
Assessing Storage Space and Measuring Watercraft Dimensions
Accurate measurements prevent costly construction errors and ensure your kayaks fit securely without obstructing garage traffic. Start by recording the overall length, maximum beam width, and hull depth of every craft you plan to store. A recreational kayak with an elevated stadium seat requires significantly more vertical clearance between rack tiers than a slim sea kayak. You should also account for accessory tracks, rod holders, and rudder assemblies that protrude beyond the basic hull perimeter.
Next, evaluate the available floor area, ceiling height, and structural layout of your storage space. Standard garage walls must accommodate vehicle door swings and walking clearance while still providing easy access for loading. Kayaks stored higher than shoulder level require adequate lifting leverage, especially when dealing with heavy rotational polyethylene hulls. Measuring your ceiling height helps you determine whether a multi-tier vertical wall rack, a freestanding tower, or an overhead hoist system best suits the room.
Material Selection: DIY Lumber Versus Pre-Engineered Steel Systems
Selecting the right framing material determines the ultimate load rating, weather resistance, and assembly time of your storage rack. Standard two-by-four dimensional lumber offers an accessible, budget-friendly foundation for custom wood builds in dry workshops and attached garages. Pressure-treated timber works better for outdoor installations, sheds, and coastal boat docks where humidity and damp air cause standard pine to rot. Wood allows you to tailor exact arm lengths, spacing intervals, and customized paddle hooks to your exact gear collection.
In contrast, pre-engineered industrial steel systems provide certified weight ratings and high strength without the bulky footprint of heavy timber. Powder-coated steel brackets resist rust, moisture abrasion, and daily wear in damp environments. Modular steel systems often feature adjustable mounting points that let you shift support arm heights as your boat lineup changes over time. While timber allows total dimensional customization, engineered steel brackets significantly reduce fabrication time and eliminate the need for compound miter cuts.
Step-by-Step Construction Plan for a Timber Wall Rack
Building a timber wall rack begins with locating the exact center of structural wall studs using a dependable electronic stud finder. Never attempt to mount a kayak rack directly into drywall or plaster using plastic anchors, because loaded watercraft exert heavy downward and pulling leverage. Mark stud locations clearly with a pencil, establishing vertical lines spaced roughly four to six feet apart. Fasten two vertical two-by-four uprights directly to the studs using heavy-duty structural wood screws or three-eighths-inch lag bolts with washers.
Once your vertical uprights are securely plumb and fastened, cut your horizontal support arms from straight two-by-four stock to match your kayak beam widths. Cut each arm roughly twenty-eight to thirty-four inches long depending on the widest hull in your fleet. Angling the top edge of each arm upward by five to eight degrees creates a natural cradle that prevents boats from sliding outward. Secure the support arms to the vertical uprights using heavy wood glue, structural screws, and four-inch corner lag fasteners.
Rigid diagonal bracing is essential to prevent horizontal support arms from sagging or shearing under sustained boat weight. Cut forty-five-degree diagonal struts from two-by-four offcuts and fasten them between the underside of each arm and the vertical upright. You can also reinforce each joint with half-inch plywood gussets screwed across the junction on both sides. Once assembled, test the rack by applying firm downward body weight to confirm there is zero flex in the structural joints.
Hull Physics and Preventing Heat-Induced Oil-Canning
Polyethylene is the most common material used in modern recreational watercraft, but it remains susceptible to plastic creep and heat distortion. When a heavy boat rests flat on narrow bars across hot summer months, the hull plastic softens and sags around those focal points. This deformation produces deep longitudinal indentations along the hull floor that disrupt water flow and ruin straight-line tracking. Preventing oil-canning requires distributing the craft weight across structural hull bulkheads rather than unsupported center bottom sheets.
Storing watercraft on their side rails or vertically upside down on their rigid gunwales provides the highest natural resistance to deformation. The curved chines and upper deck gunwales possess significantly higher structural rigidity than broad, flat hull bottoms. Paddlers storing classic sit-inside kayaks often find that resting the boat on its side against padded wall uprights preserves the hull shape indefinitely. If you must store your boat hull-down, use wide contoured cradles or flexible webbing straps to spread contact force across a broad surface area.
Protective Padding and Hull Contact Surface Engineering
Bare wood and uncovered steel brackets will quickly abrade kayak hulls, gouge gelcoats, and wear through outer weather coatings. Protective padding cushions the contact zone, creates positive friction to prevent slipping, and disperses structural load evenly across the plastic. Closed-cell EVA foam, high-density polyethylene pipe insulation, and weatherproof marine felt serve as durable protective barriers. Unlike open-cell foam, closed-cell variants will not absorb water, harbor mold, or break down when exposed to damp paddling gear.
Securing your protective padding properly ensures it stays in place during repeated loading and unloading cycles. Wrap foam tubing around horizontal support arms and fasten it securely using heavy-duty UV-resistant cable ties or outdoor staple guns. For steel arms, heavy adhesive-backed felt padding or slide-on foam sleeves provide reliable protection without peeling. Periodically inspect padding for compression hardening, grit buildup, or tears, replacing worn sections promptly to prevent bare metal or rough wood from scratching your boat.
Mounting Pre-Engineered Wall Hangers and Multi-Tier Brackets
Installing manufactured steel wall brackets offers an efficient alternative to full timber fabrication while ensuring certified weight ratings. Most heavy-duty steel hanger brackets feature pre-drilled mounting holes designed to align with standard sixteen-inch wall stud intervals. Pre-drill pilot holes using the manufacturer recommended drill bit diameter to prevent splitting the interior grain of wooden wall studs. Drive heavy structural lag screws through the bracket bases directly into the stud centers, verifying solid bite with a ratchet socket.
Spacing your wall brackets correctly along the wall ensures balanced weight distribution across the hull length. Mount brackets roughly four to six feet apart, positioning them beneath the strongest sections of the boat just forward and aft of the cockpit. Avoid placing brackets near the flexible, narrow tips of the bow or stern where thin plastic easily bends under tension. If you are mounting multiple tiers on a single wall, allow at least eighteen to twenty-four inches of vertical clearance between tiers so you can lift boats in and out freely.
Concrete block or solid masonry walls require specialized installation techniques to support heavy multi-kayak loads safely. Use a hammer drill and appropriate masonry bit to drill anchor holes into solid cinder block webbing or poured concrete. Insert heavy-duty sleeve anchors or masonry expansion bolts rather than light plastic drywall plugs. Always verify that masonry anchors are rated to handle the combined dynamic shear and pullout forces created by loaded watercraft hanging away from the wall.
Freestanding Storage Rack Assembly for Renters and Outdoor Docks
Freestanding storage racks are ideal solutions when you cannot drill into garage walls or need a moveable system for docks and patios. These multi-tier towers utilize broad base legs and rigid uprights to hold multiple watercraft in a compact standalone footprint. Commercial four-level and six-level freestanding units provide high-capacity storage for mixed fleets of kayaks, canoes, and paddleboards. Because they require no permanent wall attachments, freestanding frames offer total flexibility to reorganize your garage layout as storage demands evolve.
Assembling a freestanding frame requires careful attention to joint squareness, level alignment, and weight distribution across the base. Always place the heaviest watercraft on the bottom tier to establish a low center of gravity and prevent accidental tipping. If setting up a freestanding tower outdoors on a dock or patio, anchor the base runners to the deck planks using corrosion-resistant hardware. Adding sandbags or concrete pavers across the lower frame provides extra ballast against strong gusts of wind during seasonal storms.
Ceiling Hoist Pulley Systems for Overhead Space Optimization
Ceiling hoist systems reclaim dead overhead space by suspending watercraft cleanly above parked vehicles and workspace benches. These setups use mechanical-advantage pulley assemblies, heavy-duty nylon straps, and integrated locking rope brakes to let a single person raise boats easily. Mounting plates must be fastened directly into ceiling joists with heavy lag bolts driven straight into solid structural wood. You can align mounting brackets parallel or perpendicular to joists depending on how your garage rafters run relative to the boat length.
Proper strap placement is essential when lifting heavy watercraft toward the ceiling. Wrap wide nylon webbing straps around the hull roughly one-third of the total distance inward from the bow and stern. Ensure straps pass beneath the hull rather than hooking onto fragile carry handles, deck bungees, or rudder lines. A dual-pulley system distributes the load smoothly, but you should always tie off excess hoist rope on a wall-mounted safety cleat as a secondary failsafe.
Heavier watercraft require special structural verification before committing to an overhead ceiling hoist setup. Modern fishing rigs like pedal kayaks with trolling motors often exceed eighty or ninety pounds when stripped of batteries and primary drives. Verify that your ceiling joists can comfortably bear this dead load without sagging over time. If joist spacing does not match your hoist brackets, screw a two-by-six timber backer board across multiple joists first to distribute the pulling tension safely.
Long-Term Off-Season Maintenance and Storage Safety Protocols
Long-term storage demands proactive maintenance to prevent environmental damage, hardware corrosion, and pest intrusion. Before racking your watercraft for the winter, wash the hull thoroughly with mild soap and fresh water to eliminate grime, salt residue, and algae. Apply a high-grade UV protectant spray to plastic and composite surfaces to shield against sun embrittlement in sunny garages or outdoor racks. Remove scupper plugs, open dry hatches slightly, and loosen tension bungees to allow interior moisture to evaporate completely.
Routine hardware inspection keeps your storage system secure and prevents accidental drops throughout the paddling year. Check all lag screws, bolts, and wall brackets annually to ensure seasonal wood expansion has not loosened structural anchors. Inspect powder-coated finishes for chips or surface rust, touching up exposed steel with corrosion-inhibiting enamel paint. Finally, install cockpit covers or mesh netting over open cockpits to deter mice, spiders, and birds from nesting inside your watercraft during dormant off-season months.
Planning your storage setup with proper load distribution, secure stud fasteners, and dense protective padding protects your watercraft investment season after season. Whether you build a custom timber rack tailored to your workshop or install modular steel hangers, supporting structural bulkheads prevents hull deformation and keeps gear organized. Taking time to position brackets accurately and maintain your hardware guarantees safe, effortless boat access whenever calm water calls.
About the author
Reuben Parsons is an experienced water-sports writer and gear reviewer specializing in surfing and stand-up paddleboarding. With a background in marine biology and more than a decade of outdoor writing, He has tested hundreds of products and spent thousands of hours evaluating outdoor gear. He approach combines technical research with genuine experience on the water.