
How to Strap Down a Kayak: Safe Vehicle Transport Guide for 2026
Learn how to strap down a kayak safely for highway transport in October 2026 with step-by-step cam strap techniques, proper rack positioning, and hull safety checks.
 By Marius Fox
Updated October 5, 2026
By Marius Fox
Updated October 5, 2026

Car-topping a boat opens up endless paddling opportunities, but driving at highway speeds with an insecure vessel can quickly create a hazardous road situation. Learning how to strap down a kayak correctly is the single most critical skill for protecting both your vehicle and your watercraft before you ever reach the boat ramp. Whether you are transporting wide sit-on-top fishing platforms or sleek single sit-in kayaks, improper strapping techniques often lead to damaged vehicle roofs, crushed gunwales, or dangerous highway shifting. Using dependable polyester cam buckle lashing straps ensures your kayak stays firmly planted against wind gusts and road vibration.
Many paddlers invest in solid heavy-duty kayak rack options, yet they struggle with the actual tie-down mechanics and tension balance. Over-tightening can permanently deform a plastic hull through heat-induced oil-canning, while under-tightening allows dangerous aerodynamic lift at highway speeds. Understanding the proper routing paths around crossbars, securing critical bow and stern safety lines, and choosing the right strap length eliminates transport anxiety. By mastering a few straightforward rigging habits, you can load your craft with complete confidence and focus on your day on the water.
| Award | Product | WSG Score About WSG ScoreThe WSG Score is our own rating from 0 to 10, based on performance, design and build, ease of use, and value. It reflects independent research and is never influenced by manufacturers, retailers, or affiliate commissions. Learn more › | |
|---|---|---|---|
| Best Overall |
BRUTEBOSE 1-Inch x 10-Ft Cam Buckle Kayak Tie-Down
|
9.2/10 | Buy |
| Best Value |
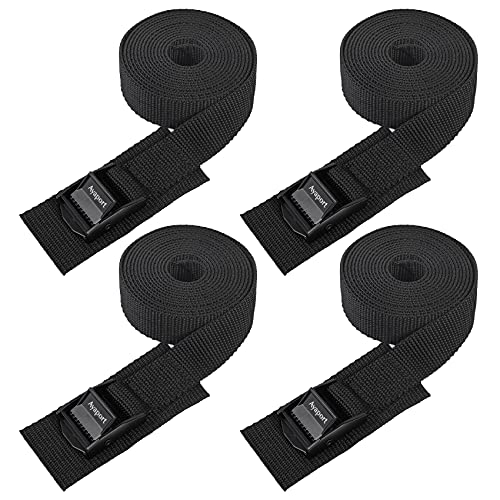 Ayaport 1" x 12' Cam Buckle Straps (4-Pack)
|
8.8/10 | Buy |
| Best Budget |
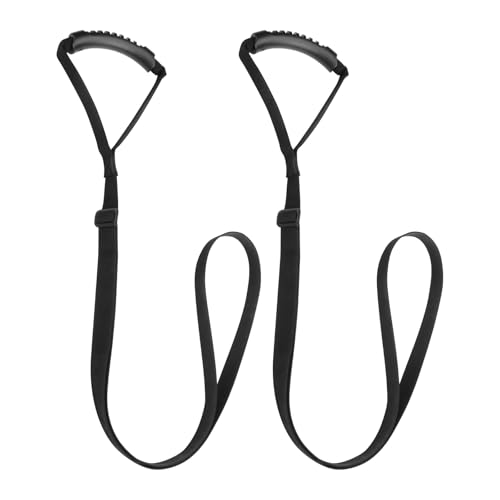 Easecos Adjustable Kayak Assist Straps, 2-Pack
|
8.3/10 | Buy |
| Best Premium |
 WEDAMER 1-Inch x 16.4-Foot Cam Straps (4-Pack)
|
8.3/10 | Buy |
BRUTEBOSE 1-Inch x 10-Ft Cam Buckle Kayak Tie-Down
This 4-pack of 10-foot cam buckle straps provides reliable, knot-free securing for kayaks and canoes on vehicle roof racks and J-cradles. Built with soft polyester webbing and aluminum alloy cinch buckles, they deliver safe manual tensioning that protects plastic hulls from deformation during transit.
Pros
- Cam buckle cinch design protects rotomolded and thermoformed hulls from overtightening damage
- 1-inch polyester webbing provides high tear resistance and minimal stretch under road vibration
- Aluminum alloy buckles deliver secure locking grip without requiring knot-tying experience
- Convenient 4-pack provides enough tie-downs to fully rig two kayaks on side-mount J-cradles
Cons
- 10-foot length may be too short for wide-beam canoes, oversized truck racks, or multi-boat stackers
- Buckles lack protective rubber or silicone pads to cushion against vehicle paint and gelcoats
- No stated working load limit (WLL) or breaking strength rating provided in manufacturer data
Ayaport 1" x 12' Cam Buckle Straps (4-Pack)
Built for quick cargo management without the weight of heavy ratchet gear, these 12-foot tie-downs offer a straightforward solution for daily hauling. They are best suited for securing kayaks, surfboards, and camping equipment onto vehicle roof racks.
Pros
- Quick cam buckle operation saves time during loading
- Durable brine yarn webbing resists everyday wear
- Four included straps easily secure four-point loads
- Lightweight construction packs away neatly in vehicles
Cons
- Not designed for heavy industrial or construction cargo
- Cam buckle provides less tensioning force than ratchets
Easecos Adjustable Kayak Assist Straps, 2-Pack
This pair of adjustable nylon straps gives kayak anglers extra leverage and balance when moving between seated and standing positions. Each line extends from 38 to 60 inches with a molded grip, doubling as a convenient dragging leash for transport.
Pros
- Length adjusts from 38 to 60 inches easily
- Durable nylon webbing resists abrasion
- Ergonomic 5.9-inch handle offers a steady grip
- Includes two complete assist straps per set
- Works well for standing support and boat dragging
Cons
- Minimum 38-inch length may be long for small cockpits
- Rigid plastic handle lacks soft foam cushioning
- Available only in a standard black finish
WEDAMER 1-Inch x 16.4-Foot Cam Straps (4-Pack)
Designed for rooftop cargo, kayaks, and light utility hauling, these 16.4-foot polyester straps secure gear quickly with spring-loaded cam buckles. They serve as a straightforward, wear-resistant alternative to mechanical ratchet assemblies for routine outdoor transport.
Pros
- High-density polyester webbing resists friction wear
- Spring-loaded grippers hold tension without slipping
- Generous 16.4-foot length accommodates bulky loads
- Faster and simpler to rig than ratchet systems
Cons
- Provides less mechanical leverage than ratcheting mechanisms
- Metal buckles lack protective padding against vehicle scratches
Securing a kayak to your vehicle roof requires understanding how aerodynamic drag, crosswinds, and vehicle vibration interact with your hull. When traveling at interstate speeds, wind forces generate substantial upward lift and lateral pressure against the broad surfaces of the boat. Strapping down a kayak properly is not merely about pulling webbing as hard as possible, but rather about creating balanced anchor points that hold the craft secure without distorting its structural integrity.
Essential Gear: Why Cam Buckle Straps Beat Ratchet Straps
Mechanical ratchet straps remain one of the most common causes of irreversible hull damage among recreational paddlers. Ratchet mechanisms utilize leverage that makes it remarkably easy to generate hundreds of pounds of crushing force with minimal hand effort. When applied to rotomolded polyethylene or thermoformed ABS plastic, this excessive tension quickly cracks structural bulkheads, bends cockpit coamings, or leaves permanent indentations. Even durable composite hulls constructed with fiberglass can suffer gelcoat fracturing and internal laminate delamination under mechanical ratchets.
High-tensile cam buckle straps provide the ideal combination of security and hull safety for paddlecraft transport. A cam buckle relies on spring-loaded mechanical teeth that grip woven polyester webbing firmly in one direction while allowing smooth tension adjustment by hand. Products like the BRUTEBOSE Lashing Straps or the twelve-foot Ayaport Adjustable Lashing Straps offer working load capacities suitable for vehicle roofs without the risk of crushing plastic walls. Polyester webbing also resists stretching when wet and maintains dimensional stability under intense sun exposure, ensuring constant holding tension throughout your drive.
Strap Length Selection and Sizing Considerations
Choosing the correct strap length determines how easily and efficiently you can rig your boat onto roof crossbars. Standard straps typically range from ten feet to sixteen feet in length, and matching the strap to your vehicle size prevents unnecessary frustration. A compact ten-foot strap, such as the ten-foot BRUTEBOSE model, works exceptionally well on small sedans carrying narrow recreational sit-in boats on bare crossbars. Wider fishing kayaks, high-profile sit-on-top hulls, and large SUVs generally require longer lengths, such as the sixteen-foot WEDAMER Kayak Tie Down Straps, to wrap around wide aero bars.
Accessories designed for manual maneuvering, such as the Easecos Kayak Stand Up Assist Strap, serve useful functions around launch ramps but should never be substituted for transport lashing. Stand-up assist cords and drag straps feature plastic handles designed for physical pulling rather than vehicular cargo restraint. Dedicated cargo lashing straps feature tested breaking strengths and specialized metal buckles engineered specifically to withstand multi-directional aerodynamic highway loads. Keeping your launch assist ropes separate from your certified transport straps preserves gear integrity and prevents accidental highway failures.
Preparing Your Vehicle Crossbars and Hull Orientation
Before placing your kayak onto the vehicle roof, inspect your crossbars and determine the safest hull positioning for your setup. Crossbars should be spaced as far apart as practical to provide a wide base of support against hull pivoting. A crossbar spread between twenty-four and thirty-six inches distributes downward pressure evenly across the strongest structural segments of the boat. Wiping down the crossbar surfaces removes road grit, gravel, or sand that could abrade your kayak finish under highway vibration.
Deciding whether to transport your kayak hull-up or hull-down depends on your specific boat design and carrier system. Sit-inside recreational kayaks often transport best hull-up directly on padded crossbars, resting securely on their rigid deck coaming and gunwales. Placing a sit-inside boat deck-down prevents rain from filling the cockpit during transit, which can dangerously increase roof weight and alter vehicle handling. Sit-on-top kayaks with pronounced hull keels usually transport best hull-down on contoured foam saddles or mounted on their side inside dedicated J-cradles.
Step-by-Step Cam Strap Routing Over Bare Crossbars
Begin the strapping sequence by laying both cam straps across your vehicle roof bars before hoisting the kayak into position. Place one strap over the front crossbar and the second strap over the rear crossbar, ensuring the buckle ends rest safely near the vehicle centerline. Carefully lift your kayak onto the crossbars, sliding it gently into position between the loose straps to avoid scratching the vehicle paint. Positioning the buckles so they rest midway up the kayak hull protects your vehicle roof panels from metal buckle contact during tightening.
Take the working end of the front strap, toss it carefully over the kayak hull to the opposite side of the vehicle, and walk around to capture it. Route the loose webbing underneath the crossbar immediately adjacent to the kayak hull, making sure the strap loops under the bar inside the rack mounting tower. Passing the webbing beneath the crossbar creates a mechanical anchor that prevents the strap from sliding outward toward the end of the bar. Toss the working end back over the kayak hull toward the side containing the cam buckle.
Walk back to the buckle side, route the loose end underneath the crossbar on that side, and prepare to feed the buckle. Press down on the spring-loaded cam buckle lever and insert the strap end through the bottom opening of the buckle housing. Pull the webbing through the teeth until all initial slack is removed from the loop encircling the kayak and crossbar. Repeat this exact looping procedure for the rear crossbar before applying final tension to either strap to maintain balanced hull alignment.
Securing Kayaks on J-Cradles and Vertical Stackers
Transporting kayaks on angled J-cradles requires a slightly modified strapping technique that anchors the boat against the upright cradle arms. Thread the working end of your strap through the upper cradle loop or behind the top of the vertical arm before resting the boat in the cradle. Rest the kayak on its side inside the cradle pads, ensuring the hull sits firmly nested into the base curves. The upright support arms bear the lateral wind pressure, allowing you to transport multiple boats or conserve roof space for cargo boxes.
Wrap the strap across the exposed hull surface, route it underneath the bottom crossbar beneath the cradle base, and bring it up to the cam buckle. Threading the strap underneath the actual crossbar rather than relying solely on the cradle hardware provides an essential secondary failsafe. If a cradle mounting bolt loosens from road vibration, the strap encircling the vehicle crossbar prevents the kayak from detaching from the vehicle roof. For vertical stackers, wrapping the cam strap around the center mast creates a similar rigid triangular anchor system that holds hulls vertical.
Rigging Crucial Bow and Stern Lines for Highway Stability
Relying exclusively on belly straps across the crossbars is a dangerous mistake that leaves your kayak vulnerable to severe aerodynamic lift. As your vehicle accelerates to highway speeds, air rushing over the hood gets forced beneath the bow overhang, creating massive upward pressure. Bow and stern tie-downs counteract this upward pitching moment and prevent the kayak from twisting laterally during violent crosswinds or emergency braking. Even if your belly straps remain completely secure, strong turbulence can rip factory crossbars directly off roof rails without proper bow and stern anchoring.
Attach your bow line to a secure structural handle or molded bow eye on the kayak using a non-stretch cord or dedicated cam tie-down. Anchor the opposite end of the line to a designated recovery point or structural chassis tow hook located beneath your front bumper. If your vehicle lacks accessible steel recovery hooks underneath, install reinforced under-hood anchor straps that bolt safely into existing fender bolt holes. Secure the stern line down to the rear trailer hitch frame, ensuring both front and rear lines remain moderately snug without bowing the hull downward.
Dialing in Proper Tension Without Deforming the Hull
Applying the correct amount of strap tension requires finding the balance between cargo security and hull protection. Pull your cam buckle straps down smoothly using one hand while steadying the buckle with your other hand against the hull pad. Tighten the webbing until the strap feels firm and taut across the hull without causing the plastic gunwales to visibly pinch inward. If you notice the sidewalls of a polyethylene boat bowing or dishing under the strap, immediately release the cam buckle and reduce the tension.
Verify total system security using the standard vehicle shake test before you leave your driveway. Grab the kayak firmly by the cockpit rim, gunwale, or side carry handle and vigorously shake the boat from side to side. The kayak should move in unison with the vehicle, causing the car suspension to rock on its tires without any slipping at the crossbars. Remember that hot summer sun softens rotomolded polyethylene, so check your tension if your vehicle sits parked in direct heat during travel stops.
Securing Excess Webbing to Prevent Flapping and Paint Damage
Leaving loose strap tails dangling untied is an annoying habit that can cause severe mechanical damage to your vehicle finish. At highway speeds, an unsecured loose strap tail whips violently against your car doors, roof panels, and windows. This rapid slapping action quickly scratches clear coats, chips paint, and produces an unbearable buzzing roar inside the vehicle cabin. Securing excess webbing tails properly is an integral part of the tie-down routine that should never be rushed or skipped.
Tie off the loose strap tail directly underneath the cam buckle housing using a sequence of secure half-hitch knots. Wrapping the webbing around the tensioned main strap and finishing with half-hitches provides a reliable mechanical lock that prevents the cam lever from opening accidentally. For paddlers transporting heavily rigged crafts like pedal-driven fishing kayaks, clearing the deck of all loose rigging before strapping down is equally vital. Removing clip-on stadium seats, drive units, and tackle crates decreases wind drag and eliminates the risk of gear detaching on the highway.
Managing Different Hull Materials: Polyethylene, Thermoformed, and Composites
Understanding how different hull materials respond to strap pressure ensures you protect your investment during road travel. Rotomolded polyethylene is remarkably impact-resistant and forgiving against shoreline rocks, but it behaves flexibly under continuous clamping force. Polyethylene hulls require wide webbing straps that distribute loads over broad surface areas rather than narrow cords that concentrate stress. Transporting polyethylene boats upside down on gunwales or using wide padded cradles prevents bottom-hull depressions that compromise straight-line tracking.
Thermoformed ABS and composite hulls constructed from fiberglass require an even gentler touch during roof rack transport. The slick acrylic cap on thermoformed kayaks can slide easily against bare metal crossbars if not properly cushioned with rubber or foam pads. Composite layups are exceptionally rigid and lightweight, meaning they do not flex to absorb strap overtightening and can suffer gelcoat fractures under excessive point load. For specialized boats like heavy-duty inflatable kayaks or composite crafts, matching strap tension to material characteristics ensures safe transit.
Pre-Trip Inspection and the Mandatory Roadside Safety Check
A complete pre-trip inspection ensures every element of your roof rack and tie-down system is fully operational before embarking on your journey. Check your roof rack mounting feet to confirm they remain tightly clamped to your vehicle factory side rails or door jambs. Inspect your polyester cam straps for signs of fraying, edge cuts, chemical degradation, or bent buckle springs that could compromise clamping strength. Discard and replace any lashing strap that exhibits torn stitching or cracked buckle castings to guarantee road safety.
Adopt the mandatory ten-mile safety stop whenever you transport paddlecraft on public highways or interstate freeways. After driving the first five to ten miles, pull safely into a rest area or roadside parking area to recheck all strap connections. Highway vibration, initial wind pressure, and vehicle body roll inevitably cause the kayak to settle deeper into rack pads, which frequently creates slight slack in the webbing. Walking around your vehicle to retighten the cam buckles, check bow and stern line tension, and inspect loose strap tails ensures a trouble-free journey.
About the author
Marius Fox brings extensive hands-on experience from both above and below the water. A PADI Master Scuba Diver Trainer and AIDA freediver, she has worked as a scuba instructor, managed diving operations, participated in shark research, and contributed to marine conservation projects. His expertise provides a practical perspective on diving, snorkeling, water safety, and adventure gear.