
How to Secure a Kayak to Roof Bars: Practical Guide for 2026
Learn how to secure a kayak to roof bars safely using heavy-duty straps and proper bow tie-downs for secure vehicle travel in October 2026.
 By Marius Fox
Updated October 5, 2026
By Marius Fox
Updated October 5, 2026

Lifting a sixty-pound rotomolded hull onto a vehicle roof is only half the battle when heading out to your favorite waterway. Highway wind shear and vehicle vibration put enormous continuous stress on your gear, making it critical to master how to secure a kayak to roof bars before hitting the highway. Using proper non-stretch cam straps alongside dedicated cradle mounts ensures your boat stays rock solid without warping the hull plastic or scratching your vehicle finish. If you frequently haul multiple paddlecraft, investing in reliable heavy-duty kayak roof rack setups provides a stable foundation that prevents shifting during transit.
Many boaters mistakenly rely on brute-force tightening mechanisms that can crush composite cockpits or induce permanent bottom-hull oil-canning. Understanding the mechanical balance between vertical downward compression and lateral resistance keeps your kayak centered over factory or aftermarket crossbars. By pairing universal J-cradles with dedicated bow and stern safety lines, you eliminate catastrophic rack detachment risks while preserving vehicle roof integrity. Taking ten extra minutes in your driveway to route each strap correctly protects your gear, your vehicle, and other drivers sharing the road.
| Award | Product | WSG Score About WSG ScoreThe WSG Score is our own rating from 0 to 10, based on performance, design and build, ease of use, and value. It reflects independent research and is never influenced by manufacturers, retailers, or affiliate commissions. Learn more › | |
|---|---|---|---|
| Best Overall |
Forluck J-Bar Kayak Roof Carrier (2 Pairs)
|
8.9/10 | Buy |
| Best Budget |
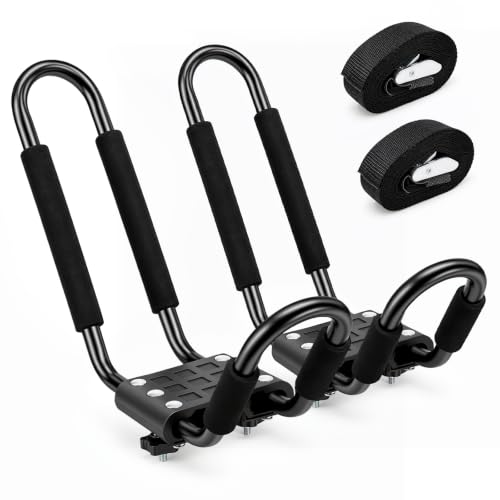 Forluck J-Bar Kayak Roof Rack (150 lbs)
|
8.3/10 | Buy |
 PIRIPARA J-Bar Kayak Roof Rack 2-Pair Set
|
8.1/10 | Buy | |
| Best Value |
 YUANSHI 2-Pair J-Bar Kayak Roof Rack
|
8.1/10 | Buy |
| Best Premium |
 Mrhardware Heavy-Duty J-Bar Kayak Roof Rack
|
8.0/10 | Buy |
 Leader Accessories Folding Kayak J-Bar Rack
|
8.0/10 | Buy |
Forluck J-Bar Kayak Roof Carrier (2 Pairs)
Built for transporting up to two kayaks, this alloy steel J-bar carrier mounts to standard crossbars with a 150-pound capacity per pair. Protective EVA foam and rubber bases safeguard boat hulls, while quick-release nuts allow tool-free installation.
Pros
- High 150-pound load capacity per pair
- Tool-free installation requires no extra equipment
- EVA padding protects watercraft from scratches
- Powder-coated steel resists rust and weather
Cons
- Compatible only with square and oval crossbars
- Conflicting listing details regarding included bar quantity
Forluck J-Bar Kayak Roof Rack (150 lbs)
Built from powder-coated alloy steel, this J-bar carrier securely transports a single kayak up to 150 pounds across square or oval crossbars. Quick-release hardware and protective EVA foam padding make it a practical, tool-free solution for solo paddlers.
Pros
- Sturdy 150-pound capacity supports heavier watercraft
- Tool-free setup with quick-release mounting nuts
- Protective EVA padding prevents scratches and dents
- Corrosion-resistant powder-coated steel tubing
- Wide-mouth opening simplifies loading and unloading
Cons
- Fixed frame does not fold flat when unloaded
- Single-pair setup carries only one kayak
- Not compatible with round roof crossbars
PIRIPARA J-Bar Kayak Roof Rack 2-Pair Set
The PIRIPARA J-Bar Kayak Roof Rack set provides two pairs of alloy steel carriers designed to haul two kayaks with a combined capacity of up to 150 pounds. It offers a practical vehicle transport solution for paddlers looking to maximize rooftop space on square, oval, or flat crossbars.
Pros
- Transports two full-sized kayaks with four total J-bar uprights included in a single package
- Wide-mouth cradle opening makes side-loading kayaks onto high vehicle roofs significantly easier
- Adjustable padding helps safeguard plastic, composite, and thermoformed hulls from frame abrasion
- Versatile bracket design mounts securely onto flat, square, and oval crossbar shapes
- Includes four 8-foot tie-down straps and mounting bolts for immediate out-of-the-box installation
Cons
- Mounting brackets are strictly incompatible with round crossbar systems
- Total 150-pound limit requires careful weight budgeting if hauling two heavy rotomolded fishing kayaks
- Included 8-foot tie-down straps may prove short for extra-wide beam hulls or tall SUVs, and bow/stern safety lines are not included
YUANSHI 2-Pair J-Bar Kayak Roof Rack
Constructed from alloy steel with a 150-pound capacity, this four-piece carrier set transports two kayaks simultaneously using padded wide-mouth cradles. It secures to most flat, oval, and square crossbars for reliable recreational gear hauling.
Pros
- Transports two watercraft at once
- Sturdy steel build with rust-resistant finish
- Includes tie-down straps and mounting accessories
- Adjustable padding helps safeguard kayak hulls
Cons
- Fixed J-frame design cannot fold down flat
- Not compatible with round crossbars
- Requires at least three inches of roof clearance
Mrhardware Heavy-Duty J-Bar Kayak Roof Rack
This dual-pair heavy-duty steel J-bar roof rack system by Mrhardware securely carries two kayaks up to 36 inches wide and 100 pounds each on factory or aftermarket crossbars. It is an ideal rooftop transport solution for recreational paddlers and families heading out to lakes and rivers with two boats in tow.
Pros
- Includes two full pairs of racks to carry two recreational or fishing kayaks on a single vehicle roof
- Comes equipped with four high-strength 10-foot ratchet tie-down straps rated to a 600-pound break strength
- Wide-mouth J-cradle profile simplifies the physical angle needed to lift and seat kayaks on vehicle crossbars
- Constructed with rust-resistant coated steel tubing and adjustable padding to safeguard boat hulls
Cons
- Not compatible with round crossbars that have a diameter of less than 1.2 inches
- Requires at least 3 inches of clear clearance space between the vehicle roof and crossbar for bolt installation
- Elevated vertical boat orientation increases aerodynamic drag and crosswind sensitivity during highway driving
Leader Accessories Folding Kayak J-Bar Rack
Designed to carry two watercraft simultaneously, this powder-coated steel carrier folds flat to clear low garage openings when not in use. It mounts without tools onto factory square or aerodynamic crossbars, making it practical for recreational paddlers needing multi-boat transport.
Pros
- Folds down flat for standard garage clearance
- Tool-free mounting simplifies attachment
- Thick foam padding protects hulls from scratches
- Durable powder-coated steel construction
- Includes four heavy-duty tie-down straps
Cons
- Not compatible with round crossbars
- Heavy total weight at nearly 24 pounds
- 150-pound limit may exclude heavier tandem kayaks
Complete Guide to Securing Your Kayak to Vehicle Crossbars
Transporting your paddlecraft safely requires a thorough understanding of mechanical friction, strap routing, and highway aerodynamics. Every vehicle traveling at high speeds generates significant aerodynamic lift and crosswind turbulence that constantly tests your roof mounting system. Knowing how to secure a kayak to roof bars properly prevents costly hull deformities, vehicle body scratches, and highway accidents. By establishing a methodical pre-drive routine, you can confidently haul any watercraft to the boat launch.
Inspecting Crossbar Specifications and Vehicle Clearances
Before lifting any kayak onto your vehicle, you must confirm that your crossbars meet the structural demands of the journey. Most factory and aftermarket roof systems feature square, oval, or aerodynamic non-circular profiles that support varying load capacities. Manufacturer guidelines generally recommend verifying dynamic weight ratings, which represent the maximum load your vehicle can safely handle while in motion. Heavy alloy steel carrier frames require rigid bars that do not flex under highway wind shear.
Adequate physical clearance between your crossbars and the vehicle roof sheet metal is equally vital. Many aftermarket carrier brackets require at least a three-inch gap beneath the crossbar to allow mounting bolts and hand-tightening knobs to turn freely without touching automotive paint. Installing hardware onto crossbars without adequate clearance can gouge vehicle clear coats or dent thin roof panels during road transit. Always inspect crossbar feet and mounting clamps to guarantee they are torqued down securely to factory side rails.
Crossbar spread, which is the distance measured from the center of the front bar to the center of the rear bar, directly influences load stability. A minimum spread of twenty-four to thirty inches provides a wide enough footprint to control rotational forces on longer kayaks. Narrow spreads concentrate leverage at the center of the hull, allowing crosswinds to pivot the craft side to side. If your crossbars are adjustable along flush or raised roof rails, position them as far apart as practical while maintaining proper balance.
Choosing Between Direct Crossbar Saddles and J-Bar Carriers
Paddlers generally choose between laying hulls directly flat on crossbar pads or supporting them vertically using specialized J-bar carrier cradles. Direct flat mounting works well for wide, stable fishing platforms or sit-on-top hulls that distribute weight broadly across rubber crossbar pads. However, hauling boats flat consumes nearly all usable crossbar space, preventing you from carrying a second boat or a cargo box. Flat carrying also exposes more surface area to highway headwinds, slightly reducing fuel efficiency on long journeys.
J-bar carriers tilt the watercraft onto its side at an ergonomic forty-five-degree angle, maximizing usable rooftop real estate. High-strength alloy steel tube construction paired with dense EVA foam padding cradles the kayak securely while isolating the hull from road vibrations. Premium folding J-cradle models feature quick-release levers that let the vertical arms collapse flat when empty, eliminating garage clearance issues without complete hardware removal. For dual-kayak transport, side-mounted J-bars are the most practical solution for standard passenger vehicles.
Hull geometry should also guide your carrier choice. Rounded touring hulls and deep-V keel lines fit naturally inside the contoured cradle of a padded J-rack. Conversely, wide pontoon-style hulls may rest awkwardly against narrow cradles if the rack mouth is too restricted. Ensuring that your carrier padding makes full contact with the kayak gunwales prevents point-load stress concentrations that could warp plastic hulls under prolonged summer heat.
Essential Rigging Gear: Cam Buckles vs Dangerous Ratchet Straps
The choice of tie-down hardware directly impacts both watercraft safety and the structural integrity of your hull. Heavy-duty non-stretch polyester webbing straps equipped with spring-loaded cam buckles are the gold standard for paddlecraft transport. Quality cam straps feature corrosion-resistant alloy buckles and thick webbing rated for hundreds of pounds of break strength. The mechanical design of a cam buckle relies on bodyweight pulling power, giving you precise control over applied tension.
Mechanical ratchet straps should generally be avoided when securing rotomolded polyethylene or composite kayaks. Ratchet mechanisms generate massive mechanical leverage that can easily crack gel coats, crush internal bulkheads, or create permanent hull indentations known as oil-canning. A paddler can easily apply over one thousand pounds of clamping force with a ratchet handle without realizing the damage being done to soft polyethylene. Cam straps provide more than enough holding power to withstand highway speeds without risking catastrophic structural crushing.
Look for cam buckles that feature integrated rubber or neoprene protective pads behind the metal teeth. These soft pads prevent the heavy metal buckles from banging against vehicle windows, marring crossbar coatings, or scuffing delicate composite kayak finishes during gusty loading sessions. Inspect your tie-down webbing regularly for fraying edges, sun fading, or grit embedded in the buckle teeth. Replacing compromised straps before they fail on the highway is a fundamental watercraft transport rule.
Step-by-Step Procedure for Positioning and Centering the Hull
Lifting a kayak onto roof racks safely requires proper body mechanics and a deliberate loading sequence. Begin by parking your vehicle on level ground away from obstacles and setting the parking emergency brake. If you are handling a heavy rotomolded boat solo, place a rubber loading mat or thick towel on the rear vehicle spoiler or bumper. Rest the bow on the rear of the vehicle, lift the stern from the ground, and smoothly slide the craft forward into the cradles.
When loading into J-bar carriers, lift the kayak so its cockpit faces outward toward you as you stand beside the vehicle. Settle the hull gently into the bottom crook of the J-frame, allowing the boat side to rest flat against the padded upright supports. Check that the widest section of the kayak, known as the beam, sits approximately midway between the front and rear crossbars. Proper fore-and-aft balance prevents the craft from tilting like a seesaw when traveling over undulating highway dips.
Take a step back from the front and rear of your vehicle to visually confirm hull alignment. The keel line should run parallel to the centerline of your vehicle to minimize aerodynamic drag and eliminate crab-walking buffeting. If you are hauling a long recreational or single sit-in recreational kayak, verify that the stern does not obstruct rear hatch clearance or extend beyond legal vehicle overhang limits. A balanced boat places minimal dynamic strain on your crossbars and carrier brackets.
Routing Primary Crossbar Straps for Maximum Lateral Retention
Securing the primary straps correctly around your crossbars creates the friction needed to hold the hull in place. Begin by draping your cam strap over the top of the kayak hull while holding the buckle end near the top J-bar loop. Pass the free running end under the crossbar directly adjacent to the carrier base, working from the outside of the vehicle inward. Bringing the strap underneath the structural bar locks the assembly directly to your roof architecture rather than just the carrier frame.
Next, bring the running end back up over the kayak hull, cross it through the upper cradle anchor loop if present, and drop it down the opposite side. Feed the webbing under the crossbar on that side, ensuring it loops completely around the metal bar beneath the mounting hardware. Bring the tail up to meet the padded cam buckle, depress the spring-loaded cam lever, and pull the strap snug. Repeat this entire sequence on the second crossbar, keeping both strap paths straight and untwisted across the boat.
Tighten both cam straps progressively by pulling downward with firm two-handed tension. You want the straps snug enough to compress the carrier EVA foam padding slightly without distorting the plastic hull contour. Test the security by gripping the kayak bow handle and giving the entire boat an energetic shake from side to side. The kayak and vehicle should move together as a single rigid unit without slipping or rattling within the cradles.
Rigging Bow and Stern Safety Tie-Downs to Vehicle Anchor Points
Primary crossbar straps hold the kayak down against the rack, but bow and stern tie-downs prevent front-to-back sliding and counter aerodynamic lift. Wind passing over your hood at highway speeds creates powerful upward pressure beneath the front of the kayak. Dedicated bow lines anchor that upward leverage directly into the structural frame of your car. Even if a crossbar clamp were to loosen unexpectedly, properly rigged end lines keep the boat anchored to the vehicle chassis.
Attach the upper end of your bow line to a structural grab handle or bow toggle on the kayak hull. For the vehicle connection point, look under the front bumper for factory steel tow loops or recovery brackets welded to the frame. If your vehicle lacks accessible front tow eyes, install hood anchor straps that bolt under the fender screws or wedge safely inside the closed hood seam. Never hook metal S-hooks to flimsy plastic front bumper fascias or thin sheet metal trim that can rip free under load.
Secure the stern line following a similar method, attaching from the rear carry handle to the vehicle trailer hitch or rear recovery hook. Bow and stern lines should form a taut inverted V shape or triangulation that stabilizes the boat against side-to-side wind deflection. Tension these lines until they are firm but do not over-crank them, as excessive bow-line tension can bend a long kayak hull like a bowstring. Always tie off any leftover cordage so loose tails cannot flap against vehicle body panels.
Mitigating Highway Strap Hum and Aerodynamic Drag
Paddlers frequently encounter an intense, droning hum while driving at highway speeds with roof-mounted gear. This annoying noise is caused by aerodynamic flutter, where flat webbing vibrates rapidly against airflow like a musical reed. The solution is remarkably simple and requires no specialized tools. Introduce two or three complete half-twists into the flat webbing strap on any exposed section between the crossbar and the hull.
These gentle twists disrupt airflow across the flat surface, spoiling vortex shedding and completely eliminating highway strap resonance. In addition to quieting the ride, reducing strap vibration prevents cyclic fatigue in the webbing fibers during multi-hour road trips. Make sure the twists remain loose and do not bunch up inside the cam buckle teeth, which must always sit flat for full grip. This quick adjustment makes long trips to remote paddling destinations dramatically quieter and less tiring.
Excess strap webbing trailing from the cam buckles also requires disciplined management before you pull out of the driveway. Never leave loose strap tails dangling where they can whip paintwork, wrap around crossbar feet, or get caught in vehicle wheels. Fold the excess length into a compact bundle and tie it securely around the tensioned main strap using half-hitch knots. Alternatively, open your car door and pinch the tail firmly inside the vehicle weatherstripping to keep it silent and contained.
The Five-Mile Highway Safety Check and Transit Maintenance
Even the most meticulously rigged roof rack system experiences micro-settling during the initial miles of driving. Road bumps, chassis flex, and aerodynamic buffeting cause kayak hulls to shift slightly within carrier cradles. High-strength polyester webbing can also experience minor mechanical stretch when first exposed to highway air pressure. Professional transport safety protocols dictate pulling over in a safe parking area approximately five to ten miles into your trip.
During this brief inspection, perform a physical tactile check on every strap, bolt, and mounting knob. Tug on each cam strap tail to take up any slack created as the boat settled deeper into the EVA foam cushions. Verify that the hand-tightened nuts securing your carrier brackets to the crossbars remain completely snug and vibration-free. Give both bow and stern lines a firm squeeze to ensure highway winds have not loosened knot anchors or hood loops.
Incorporate quick rack walk-arounds into your normal travel routine whenever you stop for fuel, food, or rest breaks. Wet weather requires extra vigilance because moisture can lubricate nylon fibers and allow slick hulls to slip more readily against rubber pads. Checking your tie-down hardware regularly takes less than two minutes and provides total peace of mind for the remainder of your journey. Safe transport habits ensure that your gear arrives in the exact same pristine condition in which it left your garage.
Common Car-Topping Mistakes That Damage Hulls and Crossbars
The most widespread mistake made by novice paddlers is neglecting bow and stern lines while relying solely on crossbar straps. While crossbar cam straps are strong, they cannot counteract violent upward leverage when semi-truck drafts catch the bow on high-speed interstates. Omitting front lines transfers all upward force directly to your roof crossbar mounts, which can rip factory rails right out of vehicle sheet metal. Always treat front and rear safety lines as mandatory components of every car-topping setup.
Another frequent mistake is strapping kayaks down so tightly under intense summer sunlight that the plastic softens and deforms. High-density polyethylene becomes pliable when exposed to hot sun, and excessive strap tension will crush the deck coaming or create bottom indentations that ruin paddling tracking. When parking your loaded vehicle at a diner or campsite under direct sun for several hours, slightly loosen strap tension to relieve hull stress. Remember to retighten every strap before resuming your highway trip.
Finally, forgetting about your increased vehicle height can lead to catastrophic collisions with garage doors, drive-through overhangs, and low-hanging tree branches. A standard SUV carrying upright J-cradles can easily exceed nine or ten feet of vertical clearance. Place your garage door opener inside the glove compartment or clip a bright reminder ribbon to your steering wheel to avoid pulling into low structures. Respecting these practical physical boundaries guarantees safe, incident-free paddling adventures every season.
Mastering these loading mechanics transforms vehicle transit from an anxious chore into a seamless part of your overall paddling routine. Quality J-cradles, heavy-duty cam straps, and rigid bow-stern lines work in unison to protect your investment across hundreds of highway miles. Always take the extra minutes to verify fastener tightness, secure loose strap tails, and check hull balance before departure. With your watercraft anchored securely overhead, you can focus completely on exploring new waters and enjoying your time on the lake.
About the author
Marius Fox brings extensive hands-on experience from both above and below the water. A PADI Master Scuba Diver Trainer and AIDA freediver, she has worked as a scuba instructor, managed diving operations, participated in shark research, and contributed to marine conservation projects. His expertise provides a practical perspective on diving, snorkeling, water safety, and adventure gear.