
How to Put on a Wetsuit: A Practical Guide for 2026
Master how to put on a wetsuit quickly and protect flexible neoprene panels during cold-water paddling sessions in October 2026.
 By Maggie Nichols
Updated October 5, 2026
By Maggie Nichols
Updated October 5, 2026

Cold morning launches often require proper thermal immersion gear before pushing off into open water. Knowing how to put on a wetsuit without catching fingernails or straining delicate seams can turn a frustrating pre-launch routine into a fast, effortless step. Whether stepping into a full steamer for offshore touring or layering a sleeveless top beneath a life jacket, fitted neoprene must sit flush against the skin to trap a thin layer of insulating water. Paddlers exploring chilly bays in traditional sit-in kayaks frequently face tight wrist and ankle cuffs that resist quick entry. Understanding the mechanics of neoprene flexibility prevents unnecessary fatigue before your paddle even touches the surface.
Modern watercraft enthusiasts balance protection against abrasion, wind chill, and unexpected capsizes by choosing specialized suits ranging from sleeveless vests to full-length steamers. Forcing tight sleeves over dry heels or pulling aggressively across the chest can quickly overstretch flexible flatlock stitching or damage high-stretch composite panels. Learning how to properly invert limbs, work fabric gradually past major joints, and utilize zipper pull cords preserves your investment season after season. Taking a methodical approach ensures your suit delivers maximum mobility for high-angle paddling strokes while maintaining crucial thermal protection under your life jacket.
| Award | Product | WSG Score About WSG ScoreThe WSG Score is our own rating from 0 to 10, based on performance, design and build, ease of use, and value. It reflects independent research and is never influenced by manufacturers, retailers, or affiliate commissions. Learn more › | |
|---|---|---|---|
| Best Overall |
Hevto 3/2mm Neoprene Front Zip Full Wetsuit
|
8.9/10 | Buy |
| Best Budget |
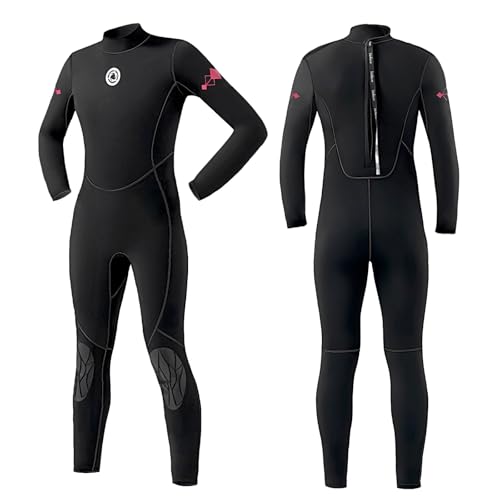 Yakevo 3mm Full Body Men's Wetsuit
|
8.8/10 | Buy |
 Hevto 2mm Front-Zip Shorty Wetsuit
|
8.4/10 | Buy | |
|
Yakevo Men's 3mm Full Body Wetsuit
|
8.0/10 | Buy | |
| Best Premium |
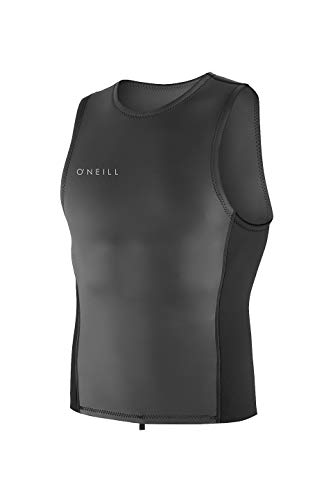 O'Neill Reactor-2 2mm Wetsuit Vest
|
8.0/10 | Buy |
Hevto 3/2mm Neoprene Front Zip Full Wetsuit
Engineered with 3/2mm neoprene and an upgraded front tank zipper, this full suit balances core warmth with mobility for cold-water paddling, surfing, and diving. The contoured cut provides buoyant support while shielding the skin from wind, sunburn, and surface abrasions.
Pros
- Flexible 3/2mm neoprene provides dependable warmth
- Upgraded front zipper simplifies getting in and out
- Integrated buoyancy assists swimming efficiency
- Protects against sunburn, wind chill, and surface scratches
Yakevo 3mm Full Body Men's Wetsuit
Geared toward snorkeling, diving, and general paddle sports, this 3mm full wetsuit protects against UV rays and underwater abrasions while preserving flexibility. Its extended back zipper pull cord streamlines dressing without requiring assistance.
Pros
- Full-body coverage guards against UV rays and scrapes
- 3mm core provides warmth while maintaining flexible movement
- Back zipper with extended cord allows easy dressing
- Reinforced stitching helps resist wear during regular use
Cons
- Not insulated for very cold or winter diving
Hevto 2mm Front-Zip Shorty Wetsuit
Tailored for warm-water activities, this shorty wetsuit pairs 2mm neoprene with a front-zip closure for straightforward entry and free arm movement. It is an accessible choice for casual surfing, paddleboarding, and snorkeling in mild conditions.
Pros
- Front zipper makes entry and exit hassle-free
- Flexible 2mm neoprene supports natural paddling motion
- Short sleeves preserve shoulder range of motion
- High-contrast panels aid visibility in open water
Cons
- 2mm thickness is too thin for colder water temperatures
- Short legs and sleeves leave limbs exposed to scrapes
Yakevo Men's 3mm Full Body Wetsuit
Built for recreational divers and paddlers, this full-length suit pairs 3mm thermal insulation with flexible, quick-drying fabric to shield against cold water and surface hazards. An extended back zipper leash helps streamline dressing, making it a functional option for everyday water adventures.
Pros
- 3mm thickness provides dependable warmth in moderate water temps
- Extended back leash simplifies solo zip entry
- Reinforced seams protect against friction and tearing
- Full-body cut guards against sun exposure and marine scrapes
Cons
- 3mm insulation is inadequate for cold water conditions
- Standard back zip design may allow minor water flush
O'Neill Reactor-2 2mm Wetsuit Vest
Built for core warmth without restricting shoulder movement, this 2mm pullover vest is an ideal layer for surfing, paddleboarding, and warm-water paddling. Its flexible Fluidflex neoprene and windproof smoothskin cut down windchill while an integrated connector anchors it securely to your boardshorts.
Pros
- Stretchy Fluidflex neoprene allows free arm rotation
- Zipperless construction eliminates bulky hardware
- Flatlock seams sit smoothly against the skin
- Boardshort connector keeps the hem securely in place
Cons
- Zipperless pullover cut can be tough to remove when wet
- Sleeveless 2mm thickness offers limited warmth in cold water
Mastering Neoprene Entry: Techniques, Zipper Mechanics, and Care
Putting on a wetsuit correctly requires patience, gradual alignment, and an understanding of how rubberized neoprene moves over dry skin. Rushing the process often results in painful pinches, overstretched seams, or tears caused by fingernails digging into fragile neoprene foam. Rolling the garment and working it up section by section creates a snug, second-skin fit that traps water efficiently without restricting paddling cadence. The following operational steps and practical solutions ensure a smooth, pinch-free entry every time you prepare for the water.
Direct Donning Principles: Working Neoprene from the Feet Upward
A wetsuit functions by trapping a thin film of water between your skin and the closed-cell neoprene foam, which your body warms during exertion. If the suit fits too loosely, cold water continuously flushes through the neck and cuffs, stripping away thermal insulation. An unevenly positioned suit creates tightness across the chest and shoulders, severely limiting arm rotation while executing repetitive kayak paddle strokes. Achieving the optimal balance starts with understanding that neoprene must be rolled onto the body rather than yanked like ordinary clothing.
Always begin the donning process completely from the lower extremities, ensuring each lower section is positioned accurately before advancing upward. Attempting to pull an entire suit up at once creates excessive tension at the waist and groin, which prevents the armholes and neck collar from seating naturally. Advancing the material in progressive increments of two to three inches distributes mechanical strain evenly across the reinforced seams. This methodical progression prevents fabric bunching behind the knees and allows the articulated panels to align with your natural anatomy.
Preparing Your Body and Environment for Smooth Entry
Entering tight neoprene is significantly easier when both your skin and the garment interior are completely dry. Moisture creates severe surface friction against smooth jersey linings, causing the rubber to stick stubbornly to your feet and calves during initial positioning. If you must gear up after swimming or in humid shoreline conditions, dusting your legs with a small amount of non-talc powder can dramatically reduce friction. Setting up on a clean, dry surface also prevents sand, gravel, and trail debris from entering the suit and causing painful chafing while seated in a kayak cockpit.
Before stepping into the legs, remove all wristwatches, rings, ankle bracelets, and sharp jewelry that could puncture the delicate inner lining. Trimmed fingernails are equally critical, as gripping neoprene with raw fingertips can gouge semi-permeable exterior panels. Standing on a clean plastic tarp, changing mat, or car floor mat keeps abrasive dirt away from your neoprene cuffs while dressing near launch sites. Clean cuffs seal more effectively against the skin, minimizing water ingress when wading out to launch in breaking surf.
Navigating Lower Extremities: Ankles, Calves, and Knees
To begin, unfasten all entry zippers and peel the entire upper half of the wetsuit down inside-out until the waist meets the hips. Fold the upper leg panels downward so you are left with direct access to the interior ankle openings. Point your toes firmly, slide one foot through the ankle aperture, and gently ease the cuff until it rests directly above your ankle bone. Repeat this exact action with your opposite foot, ensuring neither leg cuff is twisted around your shins before continuing.
Once both feet are through, use the pads of your fingers rather than your fingernails to massage the neoprene upward over your calves. Work the material in small sections toward the lower knees, smoothing out horizontal wrinkles as you proceed. For full-length models like the Yakevo Men Wetsuits 3mm Full Body, ensure the reinforced kneepads align precisely over the center of your kneecaps. Gently work the remaining thigh fabric upward until the crotch seam seats flush against your pelvic floor, which preserves full leg mobility when bracing against kayak foot braces.
Torso Positioning and Arm Sleeve Insertion
With the legs fully seated, roll the waist and lower torso material upward over your hips and lower abdomen. Smooth the front abdominal panel flat against your stomach, checking that the vertical side seams remain centered along your ribs. Suits featuring contoured waistlines, such as the Hevto Men Wetsuit 3/2mm Neoprene Full Suit Front, rely on a snug anatomical wrap to prevent cold water from pooling along the small of your back. Eliminating lower torso slack ensures the chest panel will not pinch or bind under your arms during forward paddling strokes.
Next, insert your dominant hand into its sleeve with fingers flattened like an arrow to prevent catching the narrow wrist cuff. Wiggle your hand through the opening, then gently massage the sleeve material upward over your forearm and bicep until the shoulder seam rests naturally atop your shoulder joint. Repeat this sequence for the opposite arm, easing your hand through the cuff and smoothing the neoprene past your elbow. Reaching both arms overhead and rotating your shoulders helps settle the armpit panels comfortably without creating fabric tension across your collarbones.
Securing Closures: Back Zip, Front Zip, and Pullover Styles
Different wetsuit designs utilize distinct entry closures, each requiring specific hand positioning to secure without damaging the zipper teeth. Back-zip models rely on a long zipper running from the tailbone to the base of the neck, accompanied by an extended leash cord. To close a back zipper solo, stand upright with your shoulders pulled back, grasp the extended leash behind your lower back, and pull upward in a smooth, vertical motion. Keep the pull aligned directly with your spine to avoid jamming the zipper slider against the inner neoprene gusset flap.
Front-zip suits feature an angled or vertical zipper across the chest, which offers superior convenience for paddlers dressing without assistance. When closing a front zip, pull the two sides of the chest panel together with one hand to relieve mechanical tension on the zipper teeth before drawing the slider upward with your other hand. This two-handed technique prevents the slider from snagging on the protective under-flap and ensures clean tooth engagement. Fasten the hook-and-loop neck tab firmly to create a comfortable collar seal that prevents cold water flushes when waves splash over the kayak bow.
Zipperless pullover garments, such as the O’Neill Men’s Reactor-2 2mm Pullover Wetsuit Vest, take a completely different entry route. You slide your head through the neck aperture first, followed by each arm, pulling the stretchy FluidFlex body down over your chest and ribs. Once pulled down flat, attach the integrated boardshort connector loop to your waistband to prevent the vest from riding up during torso rotation. Pullover tops provide completely uninhibited shoulder range of motion, making them popular for warm-weather paddling and core thermal reinforcement.
The Plastic Bag Technique and Friction Reducers for Tight Cuffs
Narrow wrist and ankle seals are engineered to keep icy water out, but their snug diameter often makes sliding over heels and palms difficult. One classic, practical trick for overcoming cuff friction involves using a common thin plastic grocery bag or bread bag. Slip the plastic bag over your foot before sliding it into the wetsuit leg aperture. The slick polyethylene surface allows your heel to glide effortlessly through the tightest neoprene cuff without sticking to the inner jersey lining.
Once your foot emerges through the cuff, simply reach down, pull the plastic bag free from beneath the opening, and repeat the process on your other foot and hands. Alternatively, wearing thin lycra rash socks or nylon diving socks achieves a similar friction-free glide while adding a slight layer of foot protection inside paddling booties. Water-based anti-chafing lubricants can also be applied to ankles and wrists, providing a barrier that eases entry and protects against rash during extended paddling sessions. Avoid petroleum jelly or oil-based lotions, as petroleum compounds degrade neoprene foam and weaken laminated seam glue over time.
Donning Mistakes That Ruin Seams and Tear Neoprene
One of the most frequent mistakes beginners make is gripping the outer neoprene with their fingernails while pulling hard. Neoprene is a soft, expanded cellular elastomer, and pinching it tightly between thumb and finger punctures the exterior protective skin, creating small crescent-shaped tears. Always grasp the suit using the broad, flat pads of your fingers, or grip the fabric from the interior where the woven textile lining can bear tensile loads. Rolling the material outward so you handle the inner jersey backing significantly reduces the risk of accidental surface gouges.
Another damaging error is forcing a zipper upward when resistance is felt, which invariably bends teeth or strips the slider track. If a zipper snags halfway, immediately stop pulling, back the slider down half an inch, and inspect the inner water barrier flap. Smooth out any bunched under-flap material, pull your shoulders back to narrow your chest width, and draw the zipper upward again along its natural track. Forcing a misaligned zipper can split the closure entirely, rendering the suit unusable until expensive marine-grade zipper replacements can be installed.
Integrating Wetsuits with Paddling Life Jackets and Gear Logistics
Once your wetsuit is properly donned, check how it interacts with the rest of your paddling gear before launching into cold conditions. United States Coast Guard regulations under Title 33 CFR part 175 require carrying a wearable personal flotation device for every passenger, and wearing a Type III high-back PFD over a wetsuit requires adequate torso clearance. Ensure your wetsuit collar sits flat beneath the life jacket neckline to avoid severe neck chafing during sustained torso rotations. Bulky back zippers should be covered by smooth hook-and-loop flaps so they do not press painfully against the rigid back pad of your kayak seat.
If you are loading heavy touring gear onto heavy-duty kayak roof racks prior to departure, consider donning your suit only after the heavy lifting is complete. Hoisting rotomolded polyethylene boats onto vehicle roofs generates substantial body heat, which can cause excessive perspiration inside an insulated neoprene suit before you even touch the water. Sweating heavily inside closed-cell neoprene leaves you damp and susceptible to rapid evaporative chilling once you sit stationary in a breeze. Dressing at the shoreline allows your skin to remain dry and temperate until you push off into the launch zone.
Take time to test your range of arm motion on land by holding your paddle and performing a sequence of high and low angle forward strokes. You should feel slight tension across the upper back panels, but the suit should not compress your chest so tightly that deep breathing feels constrained. Shorty suits, such as the Hevto Shorty Wetsuit Men 2mm Neoprene Front Zip, provide exceptional shoulder rotation for warm-weather paddling trips on heavy-duty inflatable kayaks. A well-adjusted wetsuit provides effortless flexibility, allowing you to paddle efficiently and stay protected against immersion risks.
Post-Paddle Removal and Storage to Maintain Neoprene Flexibility
Removing a wet suit after a long day on the water requires peeling the garment downward inside-out to protect the seams. Begin by unzipping the main closure completely, freeing each shoulder, and pulling your arms out by easing the cuffs over your wrists. Roll the torso down over your hips and thighs using the palms of your hands, then gently stretch the leg cuffs over your heels. Peeling the suit inside-out eliminates friction against wet skin and leaves the garment ready for an immediate freshwater rinse.
Salt crystals, fine sand, and pond grime degrade neoprene flexibility, causing the cellular rubber to become stiff, brittle, and prone to cracking. Thoroughly rinse both sides of your suit with cool freshwater after every session, paying special attention to zipper sliders and teeth. Hang your wetsuit to dry on a broad, contoured plastic hanger in a shaded, well-ventilated space away from direct sunlight. Storing your clean, dry suit flat or hanging loosely in a cool closet ensures the neoprene stays supple and easy to slide into on your next adventure.
Mastering these simple steps transforms gearing up from a strenuous chore into a seamless transition toward open-water enjoyment. Taking care of your seams, respecting zipper alignments, and working the material gradually from feet to shoulders keeps your neoprene supple, durable, and protective. Whether heading out for flatwater touring, coastal kayak angling, or reef snorkeling, a properly fitted wetsuit ensures you stay warm, comfortable, and focused on every stroke.
About the author
Maggie Nichols is an experienced paddler, adventure guide, and gear reviewer with more than 25 years around paddle sports. Her background includes canoe touring, whitewater rafting and kayaking, ocean kayak guiding, and extensive outdoor education. She approaches water gear with a strong focus on real-world usability, durability, comfort, and practical performance.